
Bob's Resource Website ( Oct 2007) Ranco Heater Valve Repair
Bob's Resource Website ( Oct 2007) Ranco Heater Valve Repair
Tom Bredehoft
St. Louisville, Ohio 43071
tbredehoft@alink.com
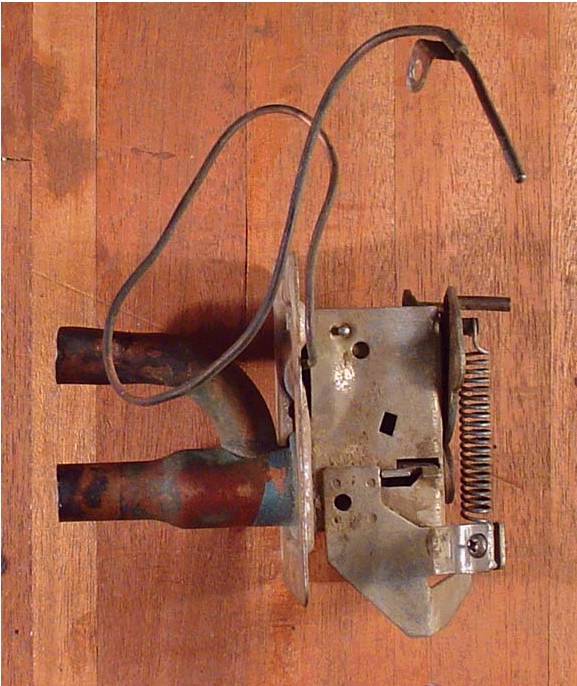
Repairing the heater control for a ’53 Commander. (I don’t know what other years/models apply, but there must be several.
 Ranco repair kit sheet
Before you begin, locate the feed tube, the one that goes directly to the valve. It must be perfectly round, there is a brass disc in the valve which must slide through it easily. It has at most .005 clearance. If you can slide a ˝ inch dowel into it, you are OK. It can be massaged gently so that your dowel will fit.
If the control doesn’t modify the temperature, look elsewhere, this explanation is for leaking controls.
Needed:
NAPA No. 660-1000 Balkamp repair kit.
Straight bladed screwdriver, very thin blade, for prying up tabs.
Needle nosed pliers, for straightening above tabs
Straight bladed screwdriver, thick flat ended for bending up brass tabs.
Ball peen hammer
Steel punch, 6 to 10 inches long, 5/16 to 3/8 diameter
1/8 in Allen wrench
7 /16 wood dowel, 3 to 12 inches long. Assuming the control is out of the car and in the workshop.
Duct Tape
|
Open the repair kit and read the directions. Notice that they are generic, only vaguely apply to the part in hand. Instruction No. 1 is OK, remove the spring, carefully, they like to jump and hide. |

|
Instruction No. 2 may need help. It says “Remove the black overtravel clip….” Mine was red. Grasp the red or black clip on the flat side and pull toward you. Again, hang on to it. |
|
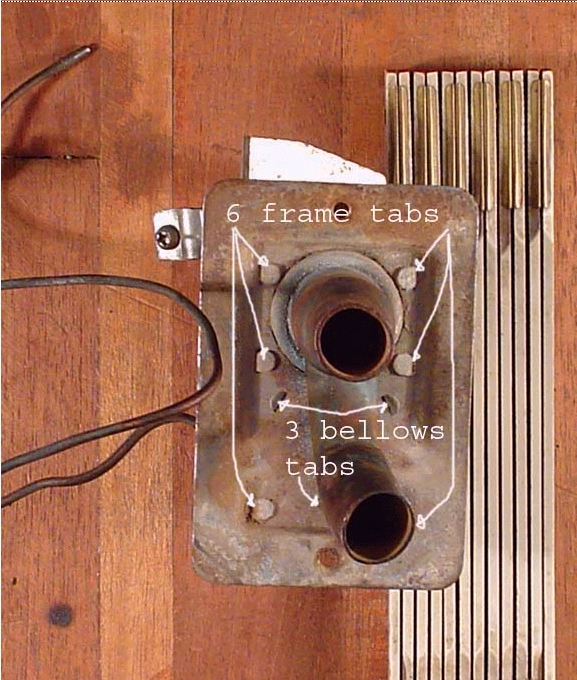
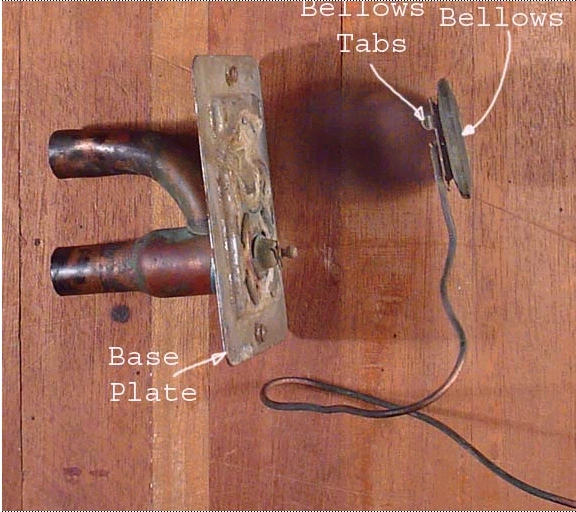
Instruction No. 3 needed correction for mine. It says “See 3 of Diagram C, it means 3 of Diagram A, pointing out what the frame is. Then it says …”by bending up (4) tabs (mine had 6) and lifting off.” The last 1/8 inch is spring loaded, no lifting needed. Be careful here there is a loose part, between the spring mechanism and the bellows. It will fall out. Straighten the three tabs holding the bellows on and remove it. Note the orientation so it can be put on in the same position. |

|
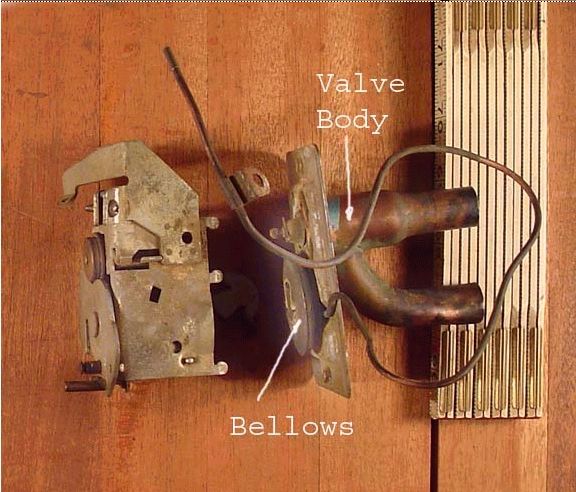
Instruction No 4 is OK as far as it goes. Clamp on the edges of the base plate with the jaws of the vise. Don’t spring it, but make it tight. Very carefully (they are brass) bend up the four curved tabs around the valve core, to remove the two tubes and the valve from the base plate. Use a hammer and the thin bladed screwdriver here, starting at one corner of each tab and gently working them upright. This is more a job for a jeweler than a blacksmith. Once they are upright, carefully work the four tabs out of the four slots. By now you’ve noticed that both the tabs and the slots are curved, and that you’ve bent them too far inward. Keep working. Once they are apart… |
|
Instruction No. 5 is OK. Notice that the top of the seal needs to be below the groove for the spring clip. Once the spring clip, bell and rotted rubber seal have been removed from the valve stem, its time to realize that the tube below it must be perfectly round or you will not get the valve stem back into the hole once it has fallen through. [this tube can be massaged so that it IS round, it takes care.] Using a 1/8 inch Allen wrench gently push the valve out the bottom of the feed tube. Polish the stem with fine steel wool or Scotch Bright. While the stem is out, make sure there are no deposits or scale on the inside of the tube. Position the feed tube upright and carefully drop the valve, stem first, in the hole. Assuming the tube IS round, the valve will drop part way into the valve body. Bounce it two or three times and the stem will fall through the hole in the other end. At this time insert the wooden dowel and secure it with Duct Tape so you don’t have to put the valve back in. I used Lithium grease to lubricate the valve stem and the inside of the new rubber for ease of assembly. Push the $12.00 rubber disc on the valve stem, making sure it goes down far enough to accommodate the bell and the spring clip which you now install. There, you’ve done all the easy work. |
|
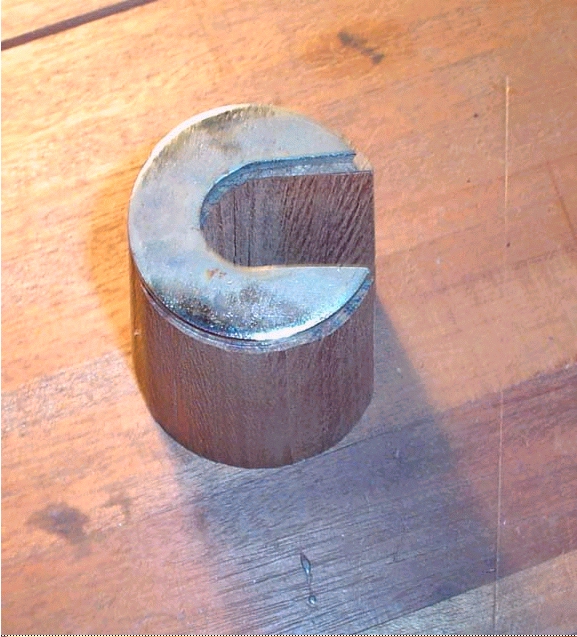
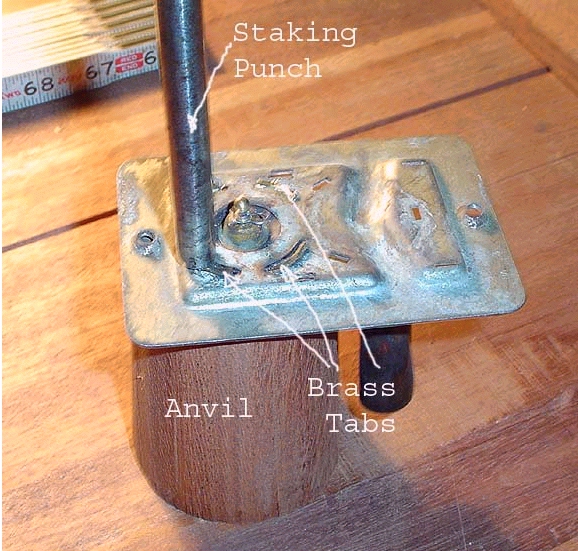
I fabricated a small anvil, from a block of hardwood and an old washer to assist staking the four brass tabs onto the base plate. I had to be careful where I was staking, making sure there was washer underneath it. If you can improve on this process, by all means, do so. Be aware that brass will, or may, work harden and break easily. |
|
|
|
Before reassembly of the frame, go over it, removing all accumulated crud with wire brush or Scotch Bright and lubricate all moving surfaces, oil for the bearings and Lithium grease for sliding surfaces. Also straighten the tabs so they will more easily enter the slots. |
|
|
|
. |
|
Put the bellows back in position, pushing the three tabs through the base plate and bending the tabs just enough to hold them in place. Careful with the tube, not to kink or break it. If it breaks say bad words and TRY to find another control valve |
|
Put the rocking pivot in position on the spring section and place the bellows and the base plate on it, carefully aligning the six tabs. They will line up (maybe squeeze the frame a bit) but you must compress the springs a bunch to get the frame seated on the base plate. I started on one end, started to bend them, then moved to the middle, ditto, moved to the other end and bent them down flat. I worked back to the other end to get them all tight. Lubricate the Overtravel Clip with Lithium grease and slide it back in. Note, the operation lever will move the one plate down to the valve for ease of installation of the clip. Re-install the spring on the operation lever and you’re good to go. At a guess, it took me two hours, including making the anvil. /Tom Bredehoft |
![]()