
Bob's Resource Website
Steel-Tech Rear Disk Brake Install - 1970 Avanti
(I tried to merge 2 pages here so some redundancy in pics and text)
|
|
|
|

|
|
|
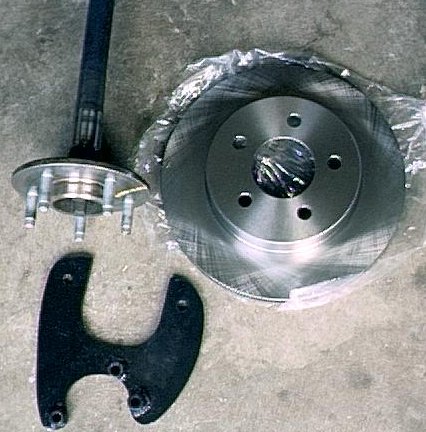
The rotors are off an 80's Lincoln and |
Installing the Rear Disk Kit The install was not hard. You remove the rear axle shafts, the backing plate, and then the Avanti e-brake cable from the brake lever and the backing plate. The hardest part is unwrapping the spring from the last foot of the cable. This is necessary to hook the cable up to the new caliper levers. |
Clean up the axle housing and install the new  CR13165 grease seals. |
|

|
|
|
Removed rear drum brake setup, repacked bearings, installed new seals (C/R 13165) |
|

|
|
|
Once the axle bearing is in the flange saddle, you can slip the flange
bolts thru the outer bearing retainer holes, thru the axle gaskets, the spacer (new bearing retainer) and the axle flange.
|
|
When re-installing the rear axles, the endplay must be adjusted to .006 or less. This is a pretty tight measurement, but necessary to avoid having the caliper pistons pump fluid back into the lines by excess rotor slop and causing a soft pedal. |
|
The adjustment is made from the Passenger side. A screw adjuster with a lock tab is common on this side (RQA/RQB). (Again, I have to stress that my car is a '69 -'70 vintage. I've had communications with others that own '80's models that have a different setup. Use a screwdriver to rotate the endplay adjustment collar, which will force the axles together inside the 'pot'. You have to check the driver side play frequently and when you get to the point where the measurement is adequate, bend the locktab on the collar Some notes I've read say to get the measurement before you grease the bearings. I dispute this, since doing it that way, you would be grinding dry bearings together ( a no-no) and you would then have to disassemble the axle again to grease them and lose the adjustment anyway. Add to that fact that those new seals do not need a 20 Lb axle banging on them more than necessary.
|
|

|
|
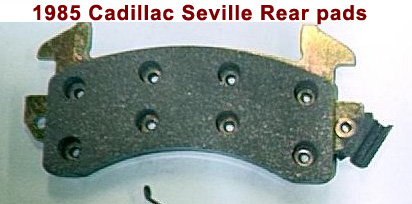
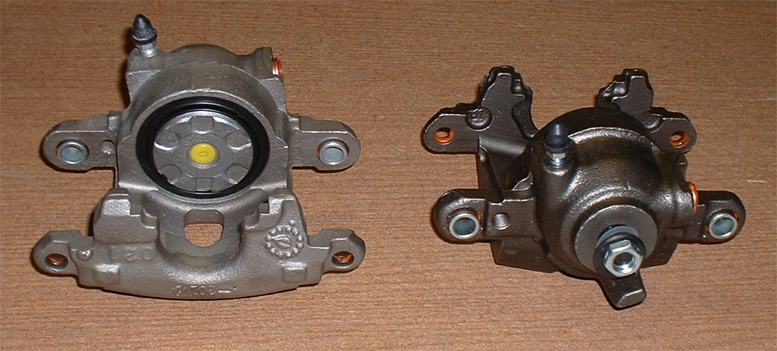
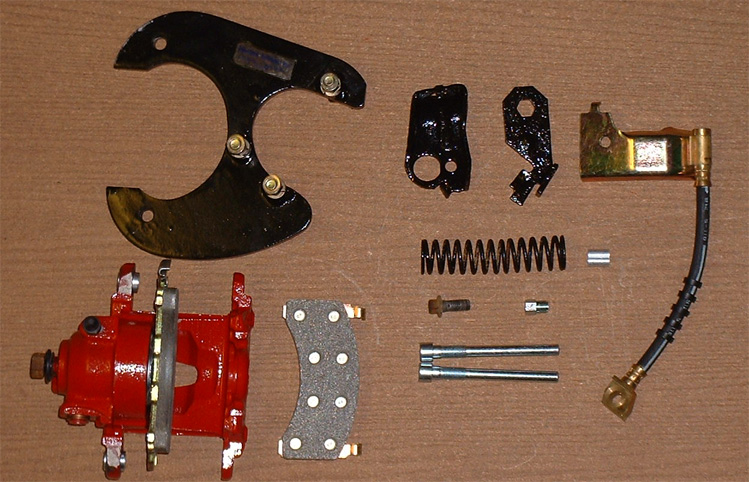
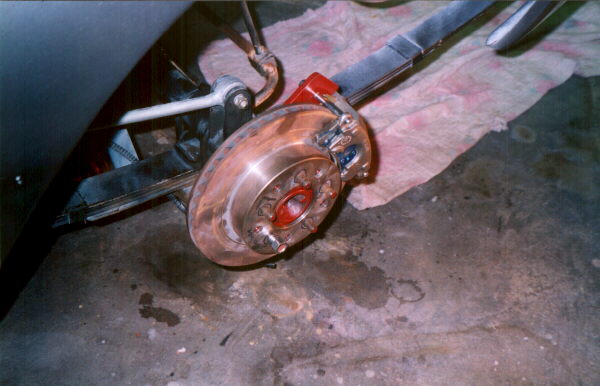
| With things loosely bolted up...The rotors are from late 80's Lincoln Continental. The calipers are from an 85 Cadillac Seville.
|
|

|
|
| The parking brake levers must be fitted to your existing Avanti brake cable. The cable is threaded thru the 2 ears that mount the traction bar on the axle. |
|

|
|
The Disk Brake E-levers are mounted with a large return spring, so you must remove the Avanti return spring at the end of the Avanti E-Brake cable. This is the tightly wound spring found inside the drum which locks into the large steel lever that actuates the old Drum brakes. The Cadillac E-Brake bracket bolts to the inside of the Caliper. The distance from the Caddy bracket to caliper E-brake lever is shorter (5.75") than the old distance from backing plate lock to lever. (7") |
|
|
|
|
The Disk Brake E-levers are mounted with a large return spring, so you must remove the Avanti return spring at the end of the Avanti E-Brake cable. This is the tightly wound spring found inside the drum which locks into the large steel lever that actuates the old Drum brakes. The Cadillac E-Brake bracket bolts to the inside of the Caliper. The distance from the Caddy bracket to caliper E-brake lever is shorter (5.75") than the old distance from backing plate lock to lever (7") |
|
The bracket needs a piece added to extend the shoulder of the cable farther toward the front of the car. |
|
|
|
|
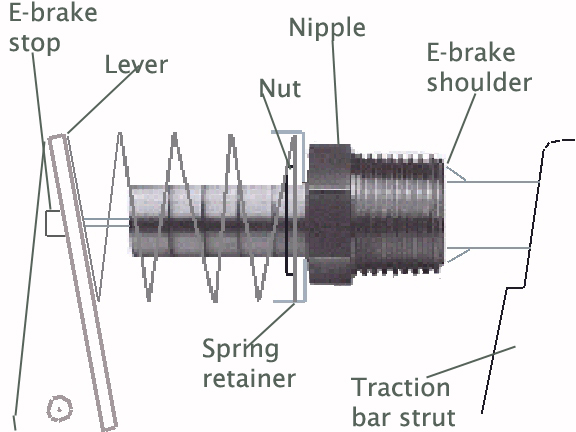
The Avanti E brake cable was then passed thru the traction bar ears, thru the large threaded part of the brass fitting and the end of the barbed section, which NOW acted as an extended stop for the cable housing and increased the distance to the Caddy lever. The large Caddy return spring fits between the base of the caliper bracket and the of the lever forcing it rearward. The E-brake cable was then under tension when the stop was fitted into the lever. It stays in place very well. |
||
 The brake line has a banjo fitting, from a Ford application with a good length of tubing to clear the leaf springs and mate with the shortened brake lines through a compression fitting.
This is the last shot |
||
| This is a final shot of the left and right when complete |
||
 Drivers Side
|
||
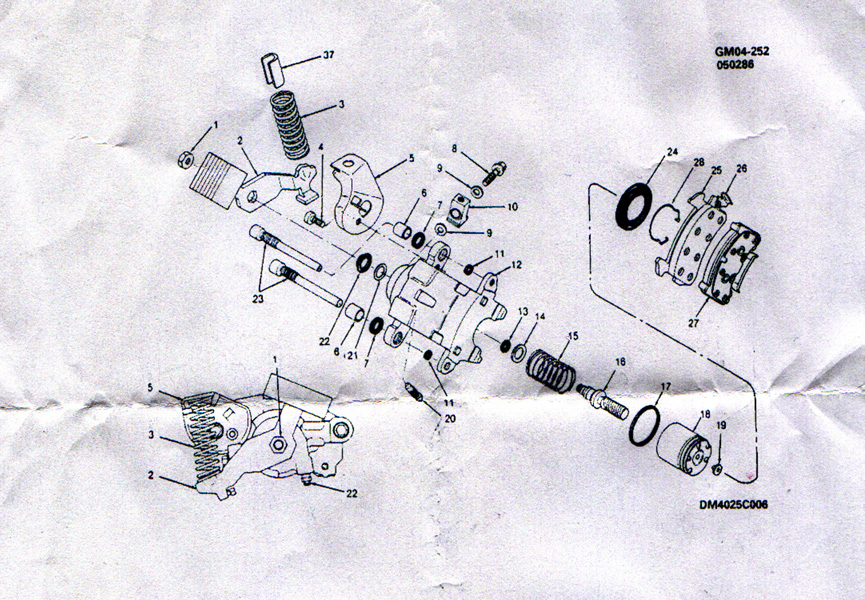
| Rear Caliper Parts List
See the added section on Stone Guards | ||
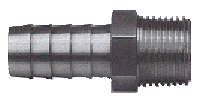
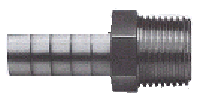
I used a large brass Fuel nipple. It had a 2 inch barbed neck for a 1/4 hose to go over> The other end was a 5/8 inch male threaded fitting.
I ground most of that barbs off the neck until it would fit thru the caddy e-brake bracket. The neck was then rough threaded to accept a nut to hold it in place, altho the spring
pressure will do this once installed.
The Avanti E-brake cable was then passed thru the traction bar ears, thru the large
threaded part of the brass fitting and the end of the barbed section, which NOW acted
as an extended stop for the cable housing and increased the distance to the Caddy lever.
The large Caddy return spring fits between the base of the caliper bracket and the
of the lever forcing it rearward. The E-brake cable was then under tension when the
stop was fitted into the lever. It stays in place very well.
The brake line had to be a banjo fitting type.. A unit from a Ford application with a good length of tubing to clear the leaf springs and
mate with the shortened brake lines through a compression fitting.

This shot is before connecting the brake line.
It swings around to parallel the axle and you can use the existing axle clips to hold
everything in place.
This is a final shot of the left and right when complete  [ 1 ] [ 2 ]
![]()
Some technical opinions are my own from experience, other informational data is from online sources with credits when available and while care has been taken to be as accurate as possible, it is offered only as a guide and caution should be exercised in the application of it.