| View previous topic :: View next topic |
| Author |
Message |
sbca96
R5 Member
Joined: 28 Feb 2006
Posts: 1674
Location: Santa Barbara, Ca
|
 Posted: Sat Feb 06, 2010 1:20 am Post subject: Re: More Accomplished Posted: Sat Feb 06, 2010 1:20 am Post subject: Re: More Accomplished |
 |
|
| SilverHawkDan wrote: | | I
also had time to make the motor mounts for the Avanti to Studebaker Mid
Engine conversion. Someone said I should have used maple instead of a
douglas fir two by four but too late now. Should work fine for the mock
up since they are built to the dimensions of the poly and metal ones
that will be here next week. |
Dan, that mount looks almost identical to the 1982-2002 Camaro/Firebird
rear transmount. There are a ton out there, a quick search found this :
https://www.byunspeed.com/product_info.php?products_id=4842
Tom |
|
| Back to top |
|
 |
SilverHawkDan
R3/R4 Member

Joined: 06 Jan 2007
Posts: 258
|
| Posted: Sat Feb 06, 2010 3:55 am Post subject: Mounts |
|
|
Tom,
Yes it is similar. I am going to use the Energy Suspension E1102
Universal engine mount and vibration dampener. It is a poly design with
the interlocking metal plates to prevent mount separation. I prefer to
use poly mounts on race cars over the solid steel. I have ripped the
mounting lugs off of small block chevies using solid mounts. Never had
that problem with poly mounts. Don't like them on a daily driver
though. Too much vibration transfer for my liking. A good rubber mount
with interlock plates works great for the street.
The mount you posted is similar to the trans mount I will be using. It
too is an Energy Suspension unit E1108 and it is just about identical
to that mount but about 1/2" taller. It is for GM and others using a
T10 trans. Although it can be used in other applications since the bolt
pattern is very popular in OEM circles.
I haven't had a chance to look at the picture of your Avanti on the
road but will do so tonight. Maybe you can cruise out Morro Bay way
next week if the weather is good and check out the Burke car. Thanks
for the input.
Dan
_________________
Grew up Studebaker. Family had a
maximum of fourteen at one time. Drag raced successfully in Southern
California. Wanting to re-live the days. Going to be flying down the
salt in the Burke Avanti in 2010. 200 MHP? maybe. |
|
| Back to top |
|
|
sbca96
R5 Member
Joined: 28 Feb 2006
Posts: 1674
Location: Santa Barbara, Ca
|
| Posted: Sat Feb 06, 2010 6:15 am Post subject: Re: Mounts |
|
|
| SilverHawkDan wrote: | | Never
had that problem with poly mounts. Don't like them on a daily driver
though. Too much vibration transfer for my liking. A good rubber mount
with interlock plates works great for the street. |
On my all stock '93 Camaro Z28 I would break those mounts every couple
of months. The torque arm from the rear axle housing lifts up on the back
of the trans stretching it. The stock rubber mount is not interlocked. I got
an Energy poly mount, but the car transfered WAY too much vibration just
as you said. It was awful to drive. I might give it a try on the '78 Camaro
project though, without the torque arm it might not be so bad, the torque
arm also transfered road vibration to the trans crossmember. Glad you
found one that worked, the way I read your post I thought you might have
custom ones made.
Tom |
|
| Back to top |
|
|
SilverHawkDan
R3/R4 Member
Joined: 06 Jan 2007
Posts: 258
|
| Posted: Sat Feb 06, 2010 8:01 am Post subject: Mounts |
|
|
Tom,
I had a friend who fought the same torque tube battle. I believe he
made a new torque tube with heim joints and added top mounted bars to
the differential to keep the axle from wrapping up. Worked well as I
recall.
I did some resaerch and with the help of the good folks at Energy
Suspension found the mounts that will work for the application. I am
going to try to make it possible for Chuck to put the car back to it's
present configuration so that he can set the car up to any of the
previous combinations. It presents a few challenges over just welding
in plates and mounts but I believe it will be worth it. Look for the
mount build shortly.
Next on the adjenda is the repair of the drivers side front fender. It
has a five inch long crack in it and it has been repaired (not very
well) before. I will have to grind out all the old stuff and build a
new support system that will prevent a re-occurance. I will post the
job on here as I think everyone needs to see what kind of trick stuff
is out there for fiberglass repair. Kent makes some very trick stuff
for this and other plastic repair. So keep watching and I'll keep
posting.
Dan
_________________
Grew up Studebaker. Family had a
maximum of fourteen at one time. Drag raced successfully in Southern
California. Wanting to re-live the days. Going to be flying down the
salt in the Burke Avanti in 2010. 200 MHP? maybe. |
|
| Back to top |
|
|
Karl
Studebaker Racing Team Member

Joined: 28 Mar 2006
Posts: 662
Location: modesto,ca.
|
| Posted: Sat Feb 06, 2010 9:08 pm Post subject: Re: Mounts |
|
|
The
mount you posted is similar to the trans mount I will be using. It too
is an Energy Suspension unit E1108 and it is just about identical to
that mount but about 1/2" taller. It is for GM and others using a T10
trans. Although it can be used in other applications since the bolt
pattern is very popular in OEM circles.
Dan[/quote]
Dan,
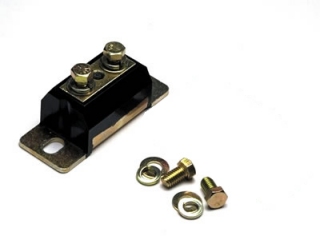
Heres a picture of the Trans. mount on the Twin. I don"t use the one that fits under the bell housing.
_________________
 |
|
| Back to top |
|
|
SilverHawkDan
R3/R4 Member
Joined: 06 Jan 2007
Posts: 258
|
| Posted: Sun Feb 07, 2010 4:59 am Post subject: Mount |
|
|
Karl,
The mount pictured is the narrow version of the one I will be using.
Same bolt patterns to crossmember but wider at trans. I am going to
build a new mounting plate since the one in the car is rusted out. I'll
post pictures as it happens.
Dan
_________________
Grew up Studebaker. Family had a
maximum of fourteen at one time. Drag raced successfully in Southern
California. Wanting to re-live the days. Going to be flying down the
salt in the Burke Avanti in 2010. 200 MHP? maybe. |
|
| Back to top |
|
|
SilverHawkDan
R3/R4 Member
Joined: 06 Jan 2007
Posts: 258
|
| Posted: Tue Feb 09, 2010 6:25 am Post subject: Yes, Progress!! |
|
|
OK.
Today I felt like I was moving forward with this project. With the help
of my friend Richard and my wife we were able to get the mock up
engine/trans set up assembled and into the car. A great big "Thank You"
goes out to Gordon Tarbell for the use of all the parts necessary to
make this happen. Gordon, enjoy the pictures. First I ran a tap through
all the holes in the block, heads, bell housing. Then I started with
the block
[img]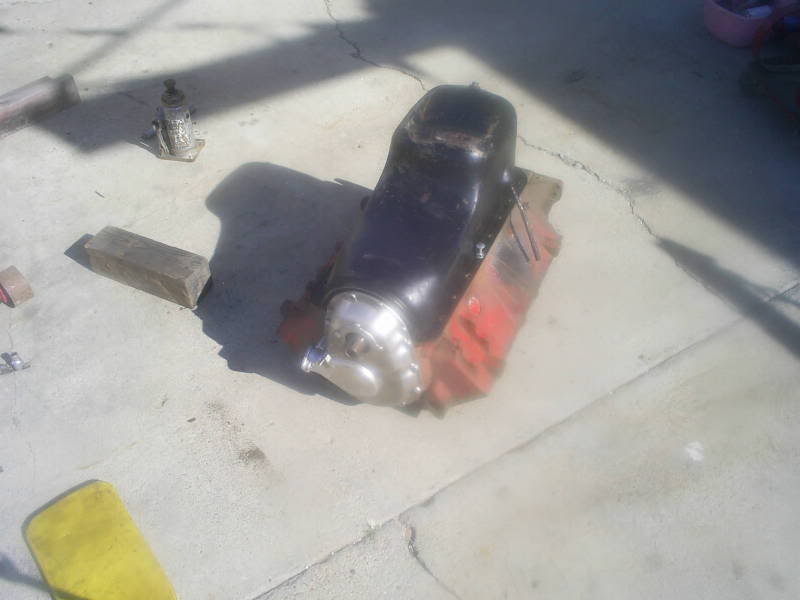 [/img] [/img]
Next came the heads and then the bellhousing and trans.
[img]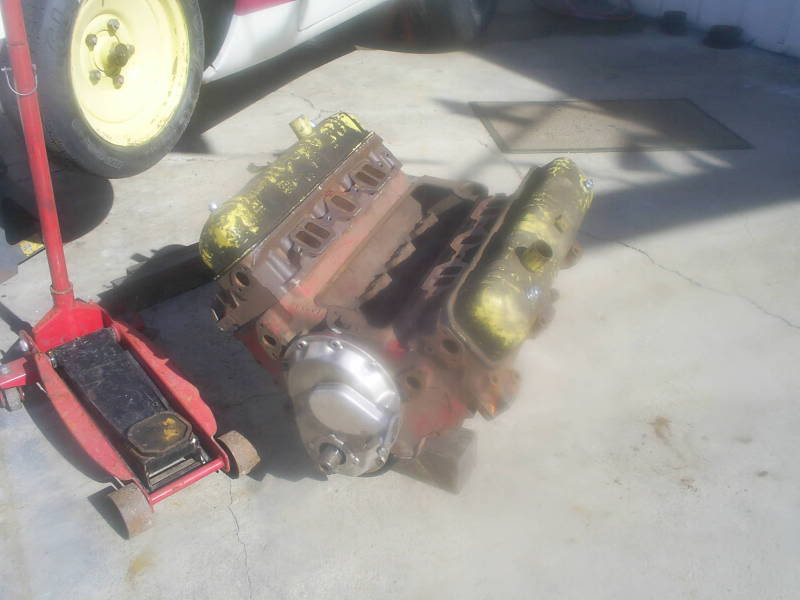 [/img] [/img]
[img]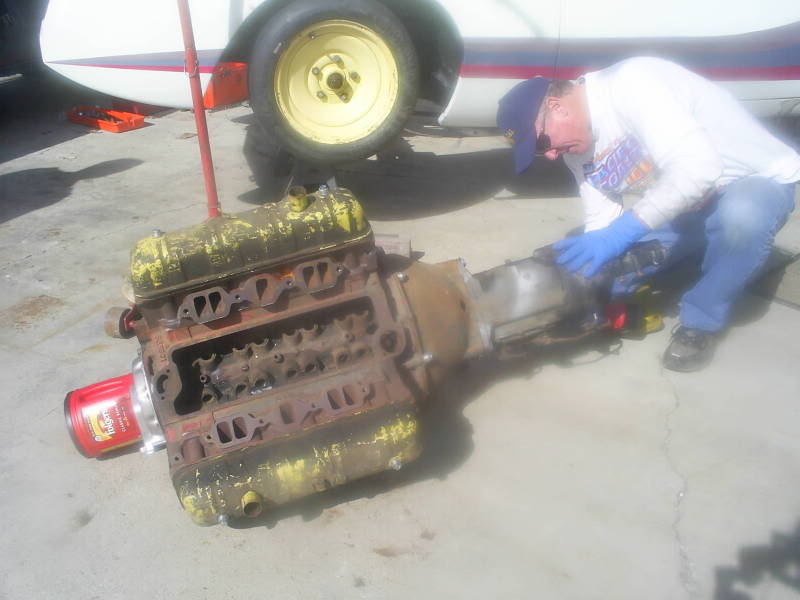 [/img] [/img]
Forgot to run the tap through the trans mount holes. Next it was time to set it all in place.
[img]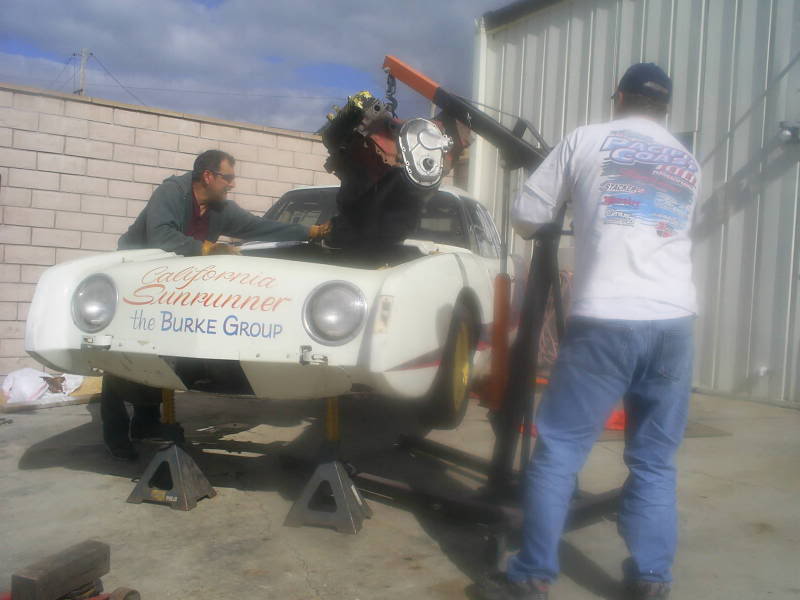 [/img] [/img]
It was an interesting task as the engine set back caused us to make
several adjustments along the way. But finally it was in place. Or so
we thought.
[img]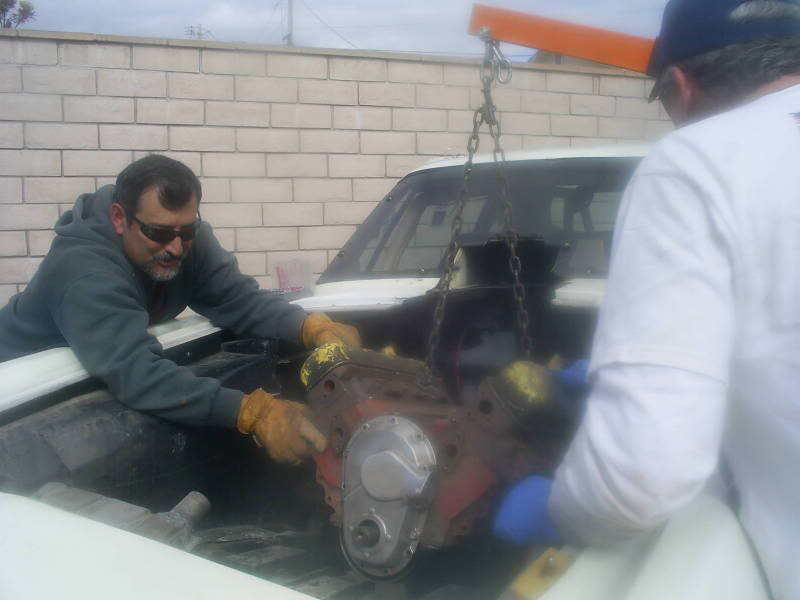 [/img] [/img]
[img]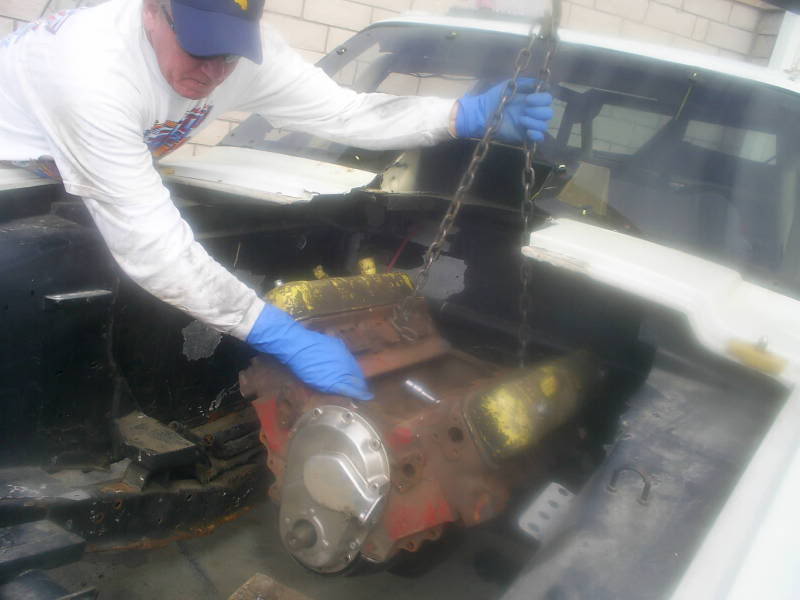 [/img] [/img]
[img]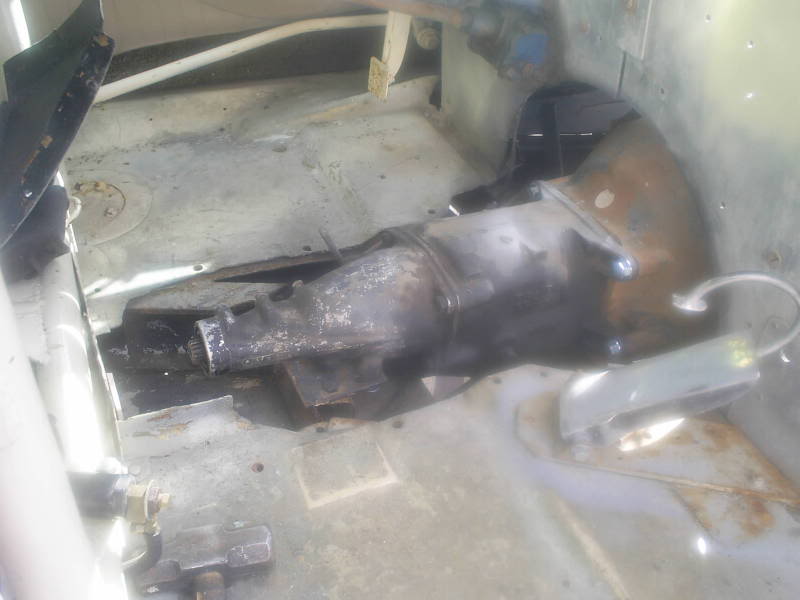 [/img] [/img]
It seems the Hemi and whatever trans they were using sat in the car
differently than the Studebaker will. So I got to do what I wanted to
for a while, I got to cut out the rusted out trans mount.
[img]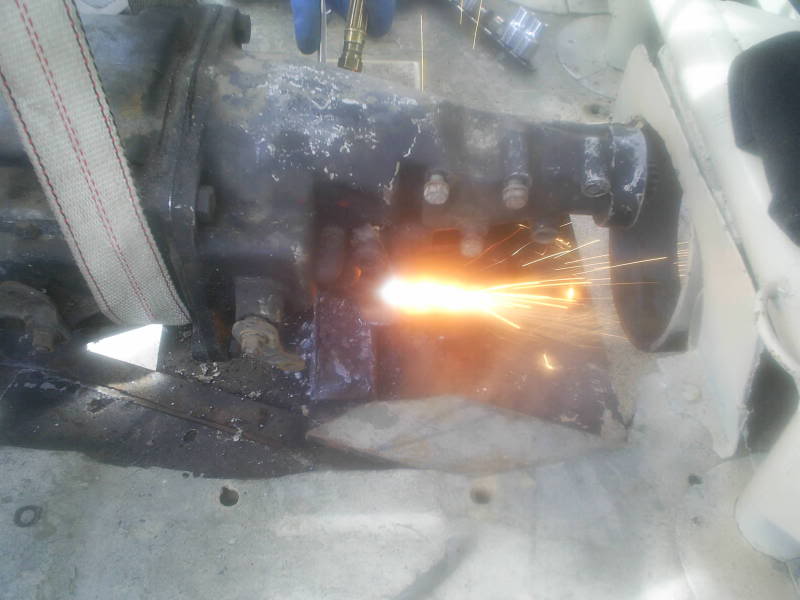 [/img] [/img]
[img]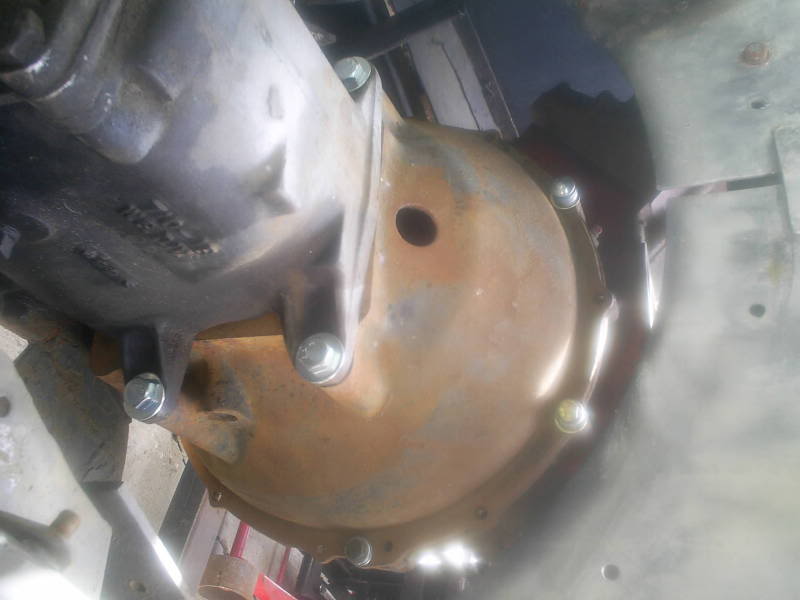 [/img] [/img]
Just as I finished that my good buddy from across the street showed
up. He is the owner of Bear Metal Kustoms and does this kind of thing
all the time. He was very helpful and reminded me of some tricks I had
forgotten about setting up for engine and trans mounts. He also saw the
wheels on the car and told me he could make a set just like the ones on
front for the rear. Cool. So now we shoved the whole mess back and we
had what we were looking for. I can now see that this set up will fit
real nice in the car.
[img]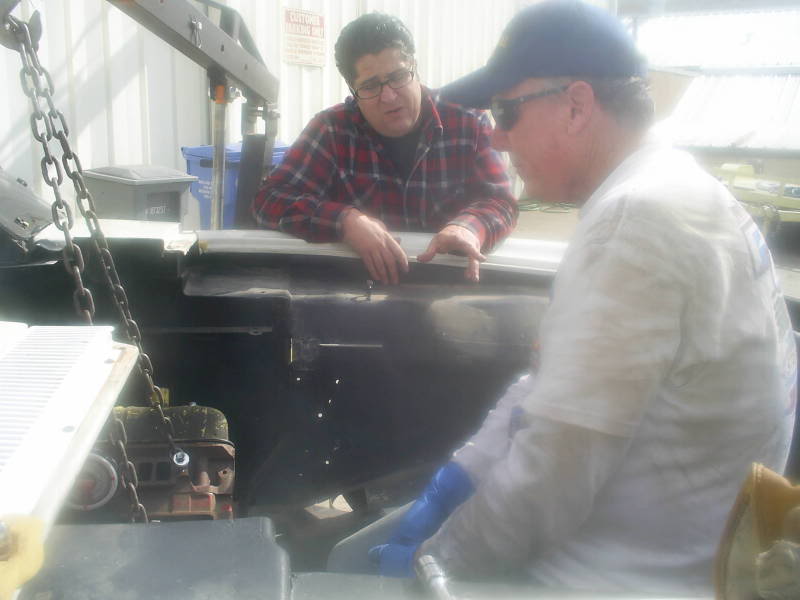 [/img] [/img]
[img]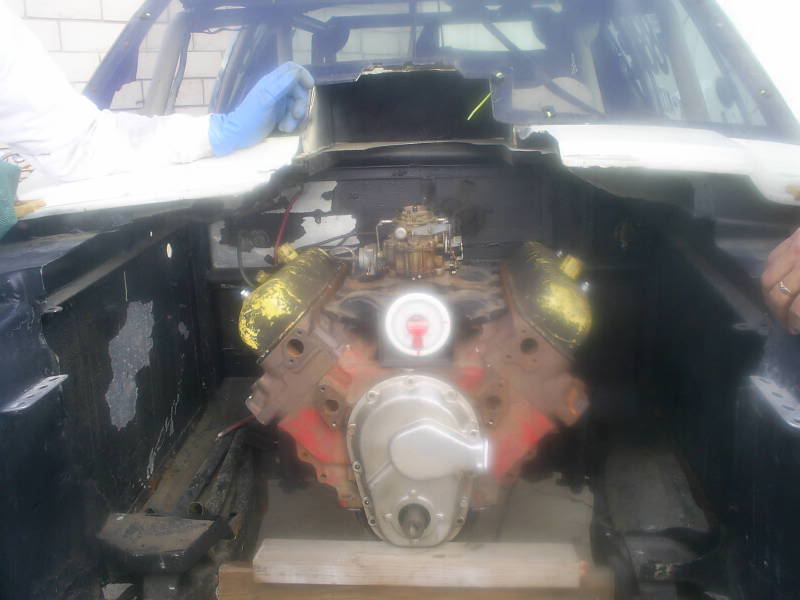 [/img] [/img]
Kind of looks puny in that big old bay they built for the Iron
Hemi. But I like it. I can get to everything real nice. I can even sit
in the engine bay and work on it. Now how cool is that. So now we will
move it back into the shop (they were doing some painting so we did the
work outside) and level everything out and fab the mounts. Decided to
drill and sleeve the frame rather then welding mounts to the frame.
That way Chuck can set it up any way he wants when I'm done flyin down
the salt with it. So look for more in a week or so.
Dan
_________________
Grew up Studebaker. Family had a
maximum of fourteen at one time. Drag raced successfully in Southern
California. Wanting to re-live the days. Going to be flying down the
salt in the Burke Avanti in 2010. 200 MHP? maybe. |
|
| Back to top |
|
|
PackardV8
Studebaker Racing Team Member
Joined: 24 Nov 2005
Posts: 1323
|
| Posted: Tue Feb 09, 2010 4:08 pm Post subject: |
|
|
Lookin' good, Dan.
Suggestion about mounts on frame, since I am going through this just now on my truck project.
1. Use 1/2" ID mechanical tubing as sleeves/spacers. It comes in 1"OD
and 1.5"OD. It is expensive unless one can find it in a scrap yard.
Since you are only going to need a couple of feet, the $1-per-inch
price is bearable. It is worth the price because 1/2" grade 8 bolts are
a perfect fit through it, it is thick enough not to crush when the
bolts are tightened and the thick shoulders add a lot of strength.
2. The Stude frames are pretty hard steel. Use a good-quality
3/16" stub bit to drill the pilot holes for the 1/2" holes. A small air
drill is easier to maneuver in the tight spaces under there than an
electric battery powered.
3. Work backward from the Stude engine to the motor mounts to the
spacers to the frame. Mock everything up, tack the spacers to the
mounts and then to a 1/8"plate which will fit inside the frame. It is
easier to use the spacers already on the mount as a pilot to drill the
holes in the frame than to try to align everything after welding. I
used the 1/2" drill bit through the spacers to make a dimple on the
frame to locate the 3/16" pilot drill, removed the mount plate, drilled
the holes, checked the mount for alignment and only then finish welded
it.
4. Find an engine shop with a Wheelabrator shot blaster. It is just great for cleaning weldments prior to painting.
thnx, jack vines |
|
| Back to top |
|
|
SilverHawkDan
R3/R4 Member
Joined: 06 Jan 2007
Posts: 258
|
| Posted: Tue Feb 09, 2010 5:48 pm Post subject: Thanks Jack |
|
|
Jack,
Are you related to Jason? He said the same things yesterday.
Although he didn't tell me "where" to get the spacers. Thanks for the
step by step. That helps hearing it from someone who's done it before.
I've done that set up for installing trailer hitches before so I am
somewhat familiar with it but you nailed it. So now I have to find some
28" tall tires on Ford rims that I can mount on the car before the
final set of the engine. Since we are going to be running carbs it
needs to be set right for the sake of the float bowls. Level ground,
right tires ect. Look for more pictures later. Next up is the front
fender fiberglass repair. Needs to be done before the lettering is
applied on Thursday.
Dan
_________________
Grew up Studebaker. Family had a
maximum of fourteen at one time. Drag raced successfully in Southern
California. Wanting to re-live the days. Going to be flying down the
salt in the Burke Avanti in 2010. 200 MHP? maybe. |
|
| Back to top |
|
|
PackardV8
Studebaker Racing Team Member
Joined: 24 Nov 2005
Posts: 1323
|
| Posted: Wed Feb 10, 2010 3:46 am Post subject: |
|
|
Dan,
most any steel supply house can cut you a length of tubing. They call
it 1/2"ID-1/4"wall for the 1"OD and 1/2"ID-1/2"wall for the 1.5"OD.
Measure how much you are going to need because the 1" is about
$1-per-inch and up.
thnx, jack vines |
|
| Back to top |
|
|
Alan
Studebaker Racing Team Member

Joined: 16 Nov 2005
Posts: 1045
Location: L.A.
|
| Posted: Wed Feb 10, 2010 4:29 pm Post subject: |
|
|
| Or
you can go to the metal supply and buy a 12' piece of 1" bar stock and
cut to approx. length and drill and ream it out to 1/2" or any other
size you need or want and it is less than $15 for 12 ft. |
|
| Back to top |
|
|
SilverHawkDan
R3/R4 Member
Joined: 06 Jan 2007
Posts: 258
|
| Posted: Thu Feb 11, 2010 2:33 am Post subject: Good Day, Bad Day |
|
|
Well
today was a mixed bag. Got some bad news about an engine I had my eye
on but turned around and half hour later had a Tremec Five Speed loaned
to me for the car. The owner told me to just bring it back when I was
done with it. To top it all off it is fully rebuilt and ready to go. So
now the fun begins.
Also secured all the metal, plasma cut for the motor mounts and got
an all clear on the design. It's good to have Bonneville guys as
customers. He even told me that I could bring any sheet metal I had up
and I could use his tools to shape, mold or whatever I needed for the
car. I even shared my custom ideas with him and he said bring my
designs and let's build them. You guys are going to love them. So if
all goes well I will be able to share some pictures of the car with the
El Mirage lettering on it tomorrow night. Keep watching and try and
keep up.
Dan
_________________
Grew up Studebaker. Family had a
maximum of fourteen at one time. Drag raced successfully in Southern
California. Wanting to re-live the days. Going to be flying down the
salt in the Burke Avanti in 2010. 200 MHP? maybe. |
|
| Back to top |
|
|
Tom Osborne
Studebaker Racing Team Member
Joined: 30 Oct 2005
Posts: 1439
Location: Port Alberni British Columbia Canada
|
| Posted: Thu Feb 11, 2010 8:30 pm Post subject: |
|
|
Dan,
This is all coming together very nice, great to have some extra fellas
willing to bend up the metal. Awesome Please keep the pictures on the
way, and look forward to the paint job. Tom O.
_________________
"First by far with a post war car"
TOM-O-HAWK STREET/STRIP Project |
|
| Back to top |
|
|
mbstude
R2 Member
Joined: 27 Aug 2006
Posts: 155
Location: South Georgia, USA
|
| Posted: Thu Feb 11, 2010 9:31 pm Post subject: |
|
|
I love watching another's life long dream come true. Especially when it involves a special Avanti and Bonnevile. 
Thanks for keeping us in the loop, Dan. I'm loving it.
_________________
Matthew Burnette
Your Friendly Stude Trim Bender
Starlight Stainless
912-253-3037
|
|
| Back to top |
|
|
sbca96
R5 Member
Joined: 28 Feb 2006
Posts: 1674
Location: Santa Barbara, Ca
|
| Posted: Thu Feb 11, 2010 10:55 pm Post subject: Re: Good Day, Bad Day |
|
|
| SilverHawkDan wrote: | | had
a Tremec Five Speed loaned to me for the car. The owner told me to just
bring it back when I was done with it. To top it all off it is fully
rebuilt and ready to go. |
Dan Giblin is the one who made the adapter I used for my TKO swap.
Tom
_________________
'63 Avanti, 03 Mustang Cobra 13"
front disc/98 GT rear, 03 Cobra 17" wheels, GM alt, 97 Z28 leather
seats, TKO TR-3550 5-spd, Ported heads w/SST full flow valves, 'R3' 276
cam, Edelbrock AFB Carb, GM HEI distributor, 8.8mm plug wires |
|
| Back to top |
|
|
Karl
Studebaker Racing Team Member
Joined: 28 Mar 2006
Posts: 662
Location: modesto,ca.
|
| Posted: Thu Feb 11, 2010 11:02 pm Post subject: |
|
|
Dan,If you need a adapter for your TKO let me know. Have one you can use. have a out put yoke also. 
_________________
|
|
| Back to top |
|
|
SilverHawkDan
R3/R4 Member
Joined: 06 Jan 2007
Posts: 258
|
| Posted: Fri Feb 12, 2010 7:04 am Post subject: Awesome |
|
|
To Tom and Karl,
You guys are awesome. Thank you for the information and the offer of
the adapter. It's because of guys like you and others on this site that
this project is even taking shape. I will let you know if I need the
adapter.
OK, today my lettering guy cancelled again. He is set for tomorrow
afternoon so we shall see. But since I was planning to go there anyway
I thought I would get a start on the fiberglass repair. The left front
fender is in bad shape so I started there. The biggest problem was a
busted out piece that had started a stress crack that was growing up
the fender. So first things first, I drilled a hole at the top of the
crack to stop the progress.
[img]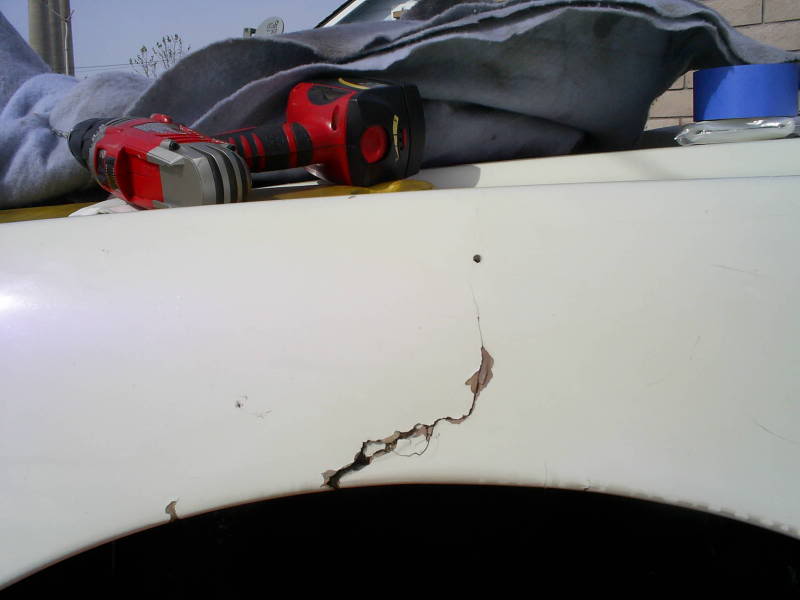 [/img] [/img]
Next you have to understand that todays plastic repair materials
are stronger than the OE fiberglass but flex at the same rate to
prevent pop out. So the idea is to allow the material to bond to the
existing glass and fill a gap that allows for strength. So the next
step was to remove all loose pieces and "V" grind the crack. V grinding
creates a channel for the repair to strengthen the damaged area. If you
just put repair material in the crack but don't V grind it you are
depending on the material to keep the two pieces together. If you V
grind it then the material is doing all the work regardless of movement
of the now two pieces. Normally I would grind a V channel about 3/8"
wide on each side of the crack and then fill it in. But since I am
trying to minimize the paint damage I stuck to a 1/4" or less V on the
outside. I was much more agressive on the inside although I couldn't go
too crazy since the fender has been repaired several times and is real
thin. So I just made sure I could get the strength I needed to prevent
a re-occurance of the crack and separation.
[img]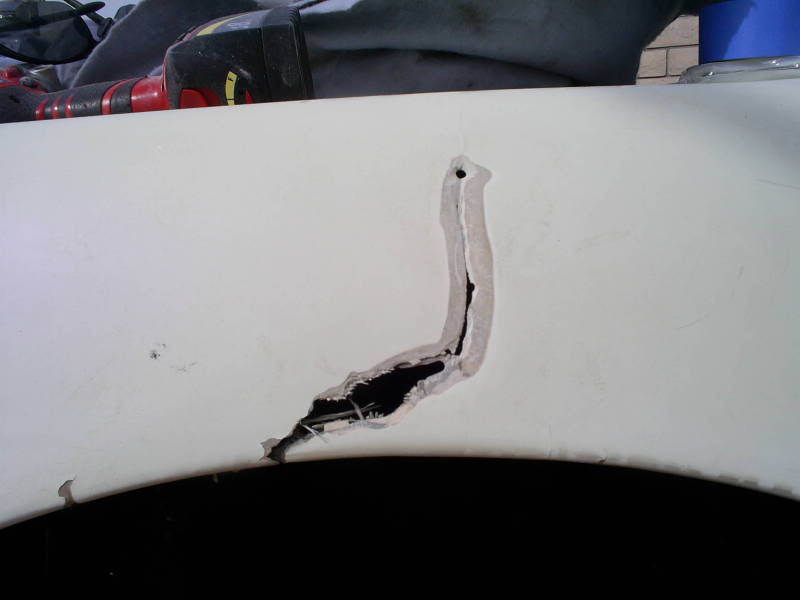 [/img] [/img]
[img] [/img] [/img]
[img]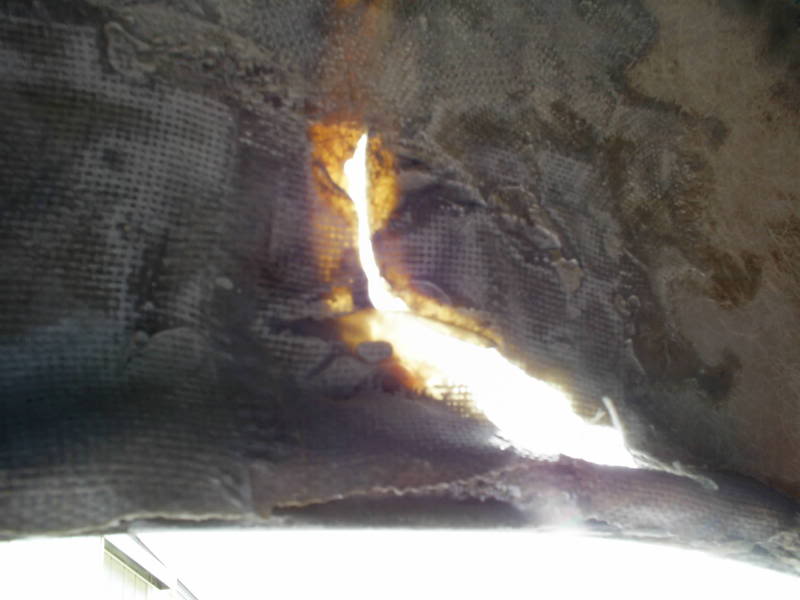 [/img] [/img]
[img]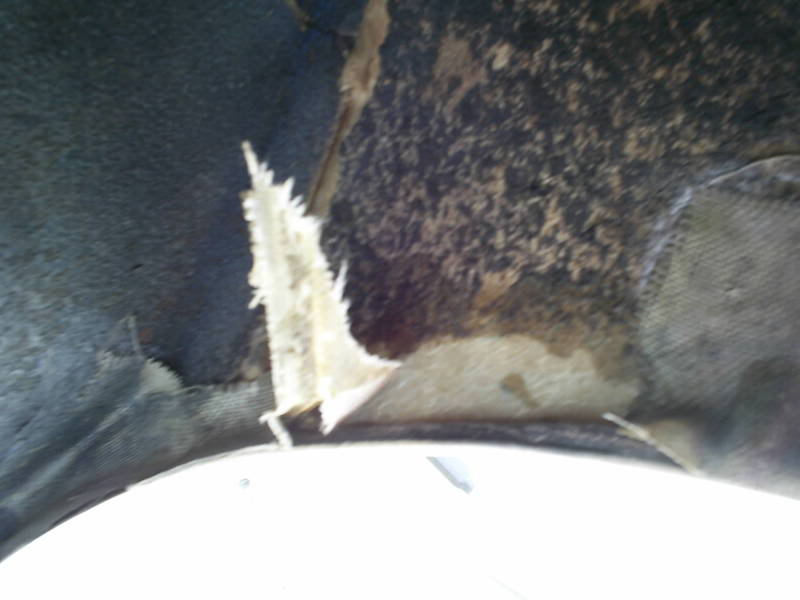 [/img] [/img]
[img]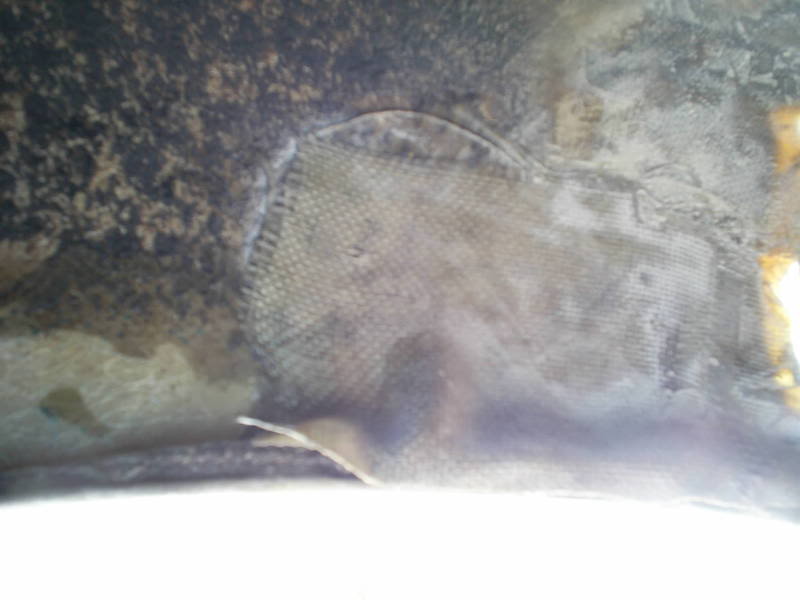 [/img] [/img]
[img]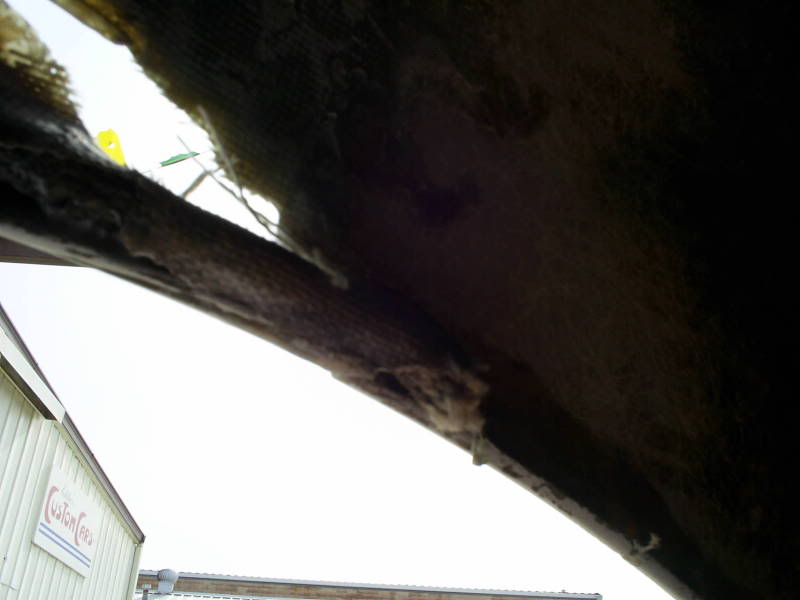 [/img] [/img]
The next step is to clean the area completely of all sanding dust
and grease or oil or any other thing that will prevent adhesion. With
rigid plastic you can use a solvent based product to do the cleaning. I
recommend a spray can over a rag and squeeze can to prevent lint. On
flexible plastics never use a solvent based cleaner. It will bring the
release agents to the surface and you will think you are trying to glue
to a greasy plastic part. Use soap and water or even better and mixture
of water and vinegar works great. Our Kent cleaner is made up of
vinegar , water and other agents that clean and promote adhesion. Now
it is time to attach the patch material. Kent makes it's fiberglass
repair patch with a two part set up. A strong plastic mesh and a kitty
hair fiberglass backing. The mesh has an adhesive already applied so it
sticks to the area being repaired and looks like this.
[img]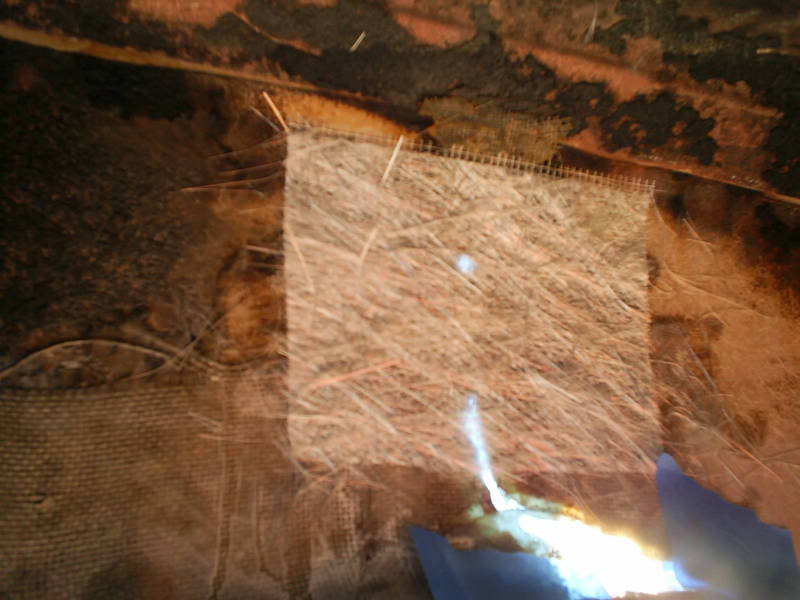 [/img] [/img]
Now you are probably wondering why I only prepped and patched the
top part of the damaged area. I was forced to do this because the lower
area was so bad that when I tried to grind on it it flexed so bad it
started to cause cracks up top. So I figured the only thing to do was
stabilize the upper area and then proceed with the lower repair. Next
came the Chem-Weld 45 repair material. It was at this time that I
realized that the only material I had on hand was the 45. I would have
liked to use the 15. The 15 and 45 refer to the work time on the
material. The longer the work time the longer the cure time also. Since
it was cool outside I could have made a smoother repair with the 15 but
the 45 works OK.
[img]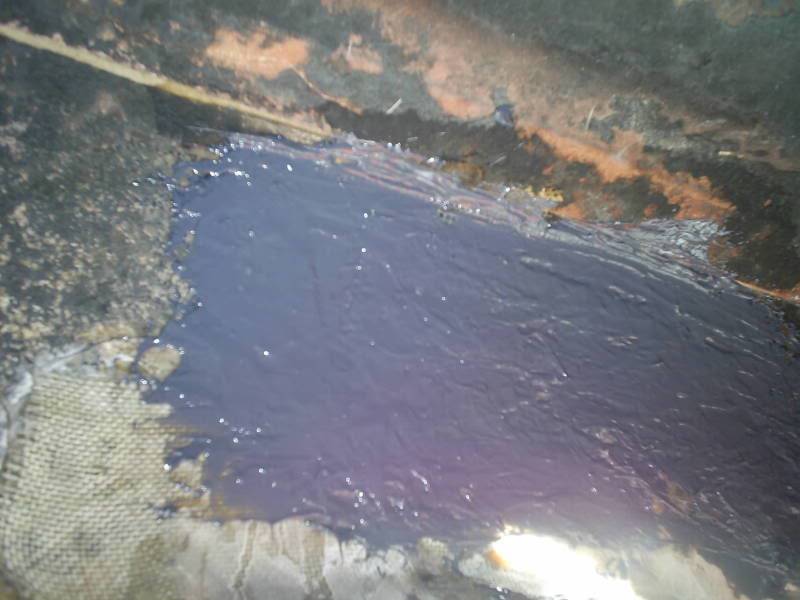 [/img] [/img]
[img]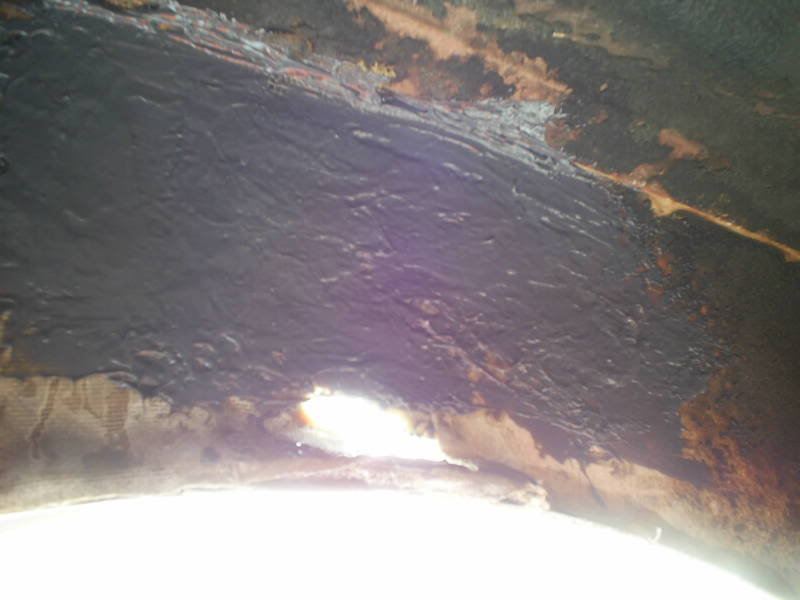 [/img] [/img]
With the back side covered I applied a small amount of repair
material to the outside. The whole idea is to fill in the channel you
create when you V grind.
[img] [/img] [/img]
I then proceeded to make repairs on the other four areas of damage.
I made my repairs to the back and then filled the channel. When I go
back next time I will sand the excess material away and then use our
Chem-Patch finishing glaze to finish filling in the channel. It is like
a bondo for plastic. Again we make two glazes. One for rigid and one
for flexible plastics. Look for that part next time. I took some cool
pictures while I was waiting for the material to cure up. I didn't want
the cover to stick to the repair areas. I'll share those pics later. So
here are the other areas I repaired.
[img]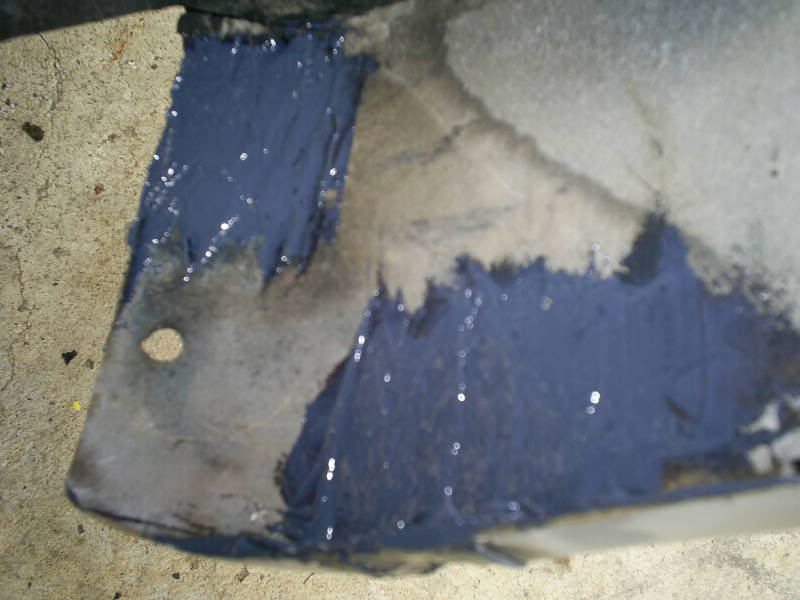 [/img] [/img]
[img]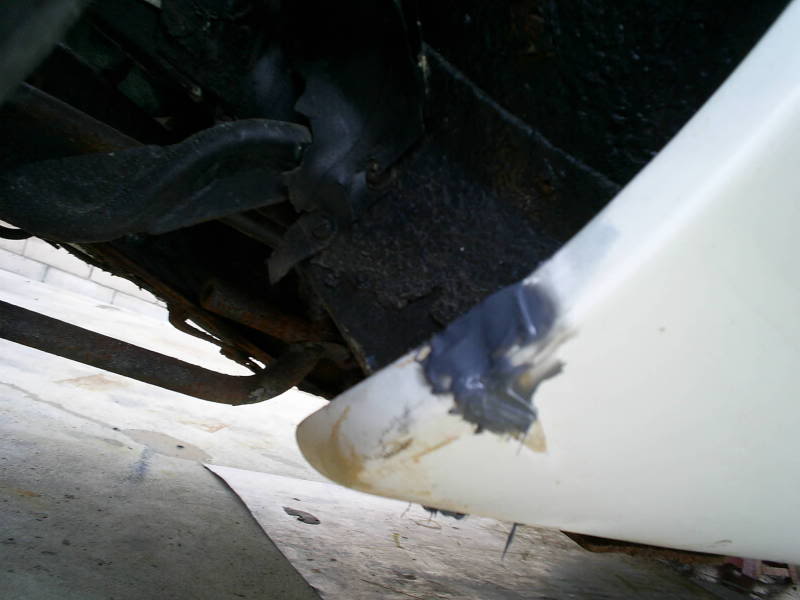 [/img] [/img]
[img]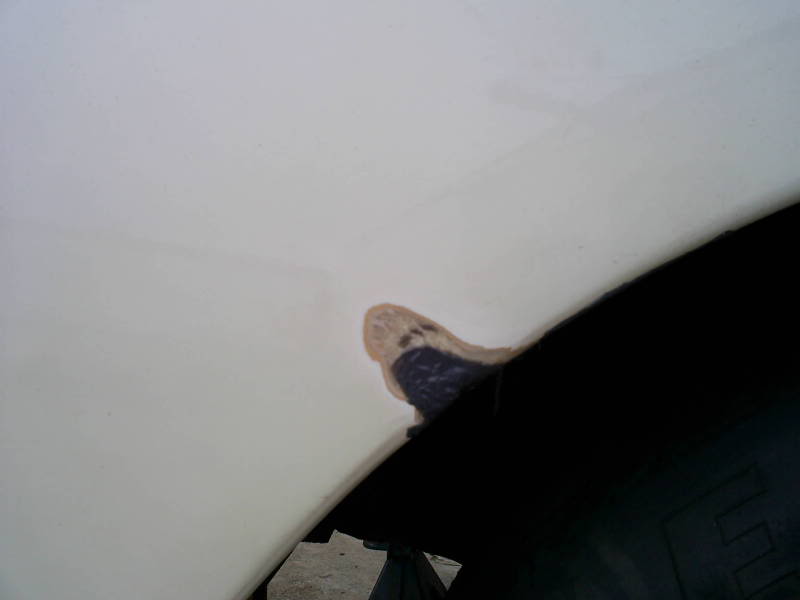 [/img] [/img]
[img]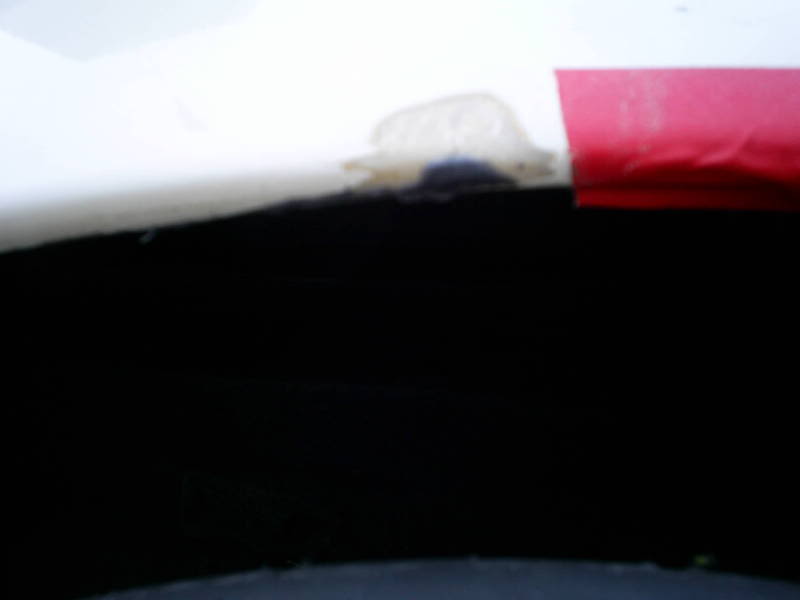 [/img] [/img]
Keep in mind that the repair on the back side is two to three times
larger than the front side. Also the material can be sanded down after
it cures if you need a smooth or cleaner looking repair. Since this is
in the wheel well I don't figure to make it pretty, just strong. That's
it for tonight. More tomorrow. I don't plan on working on the car
tomorrow since I will be celebrating my Birthday. This is #5 I wasn't
supposed to be here for so I take the day to reflect on my many
blessings. This year each of you is included in that list.
Dan
_________________
Grew up Studebaker. Family had a
maximum of fourteen at one time. Drag raced successfully in Southern
California. Wanting to re-live the days. Going to be flying down the
salt in the Burke Avanti in 2010. 200 MHP? maybe. |
|
| Back to top |
|
|
sbca96
R5 Member
Joined: 28 Feb 2006
Posts: 1674
Location: Santa Barbara, Ca
|
| Posted: Fri Feb 12, 2010 8:19 am Post subject: |
|
|
Happy Birthday!
Tom |
|
| Back to top |
|
|
Sonny
Site Admin
Joined: 01 Jan 1970
Posts: 1454
Location: About 20 miles south of Columbia, SC
|
| Posted: Fri Feb 12, 2010 8:56 am Post subject: |
|
|
Happy Birthday Dan! Here's to many, many more!
I can't thank you enough for such in-depth "coverage" of the Burke
Avanti resurrection. In fact, I look every day for your updates &
progress reports!
_________________
Sonny |
|
| Back to top |
|
|
SilverHawkDan
R3/R4 Member
Joined: 06 Jan 2007
Posts: 258
|
| Posted: Fri Feb 12, 2010 10:54 pm Post subject: Thank you! |
|
|
Thank
you to everyone for the Birthday wishes. Just kicking back and enjoying
the day. Waiting to see if the lettering guy cancels again.
Yesterday while I was waiting for the plastic repair to cure I
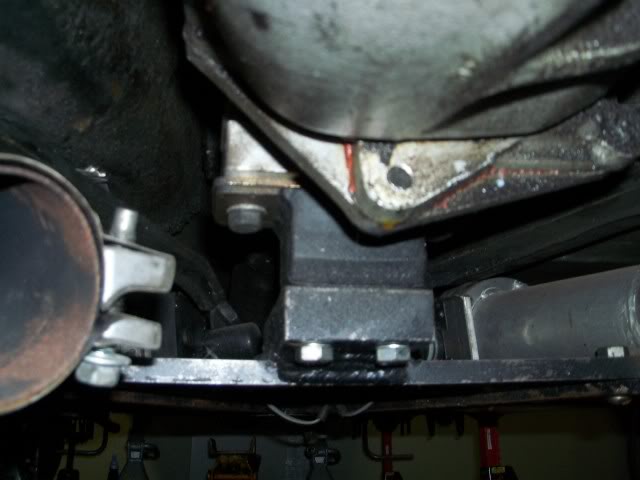
took the hood off the Avanti and pulled the engine forward about 2
inches. I put a block of wood under the trans mount and then started
taking some pictures that will help me in planning the mounts and
headers. I also pulled the passenger side dog house panel out to see
what kind of access it provides. The drivers side plate requires taking
the steering linkage apart. I will need to modify that so that it can
be removed easily. So here are some pictures I took.
[img]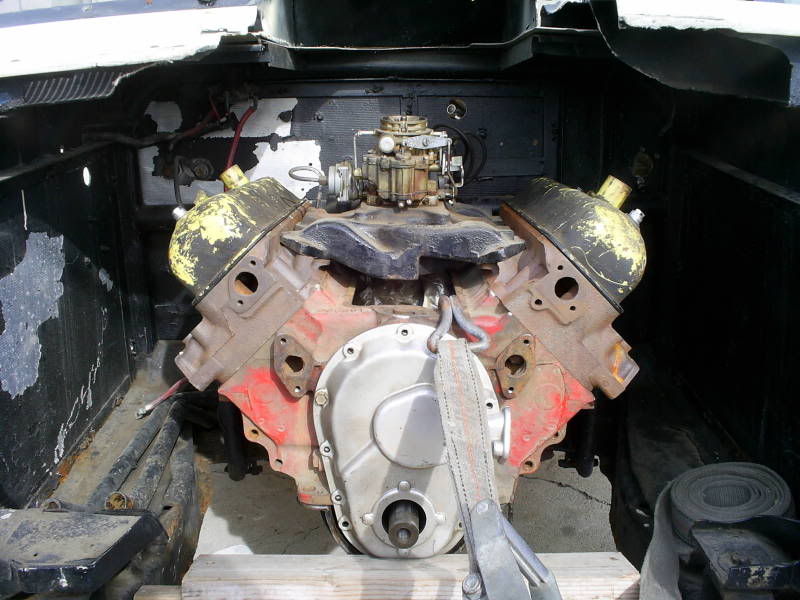 [/img] [/img]
That Studebaker engine sure looks good sitting in that massive
engine bay. Kind of makes you wish all cars had that kind of access.
Check out the access on each side of the engine.
[img]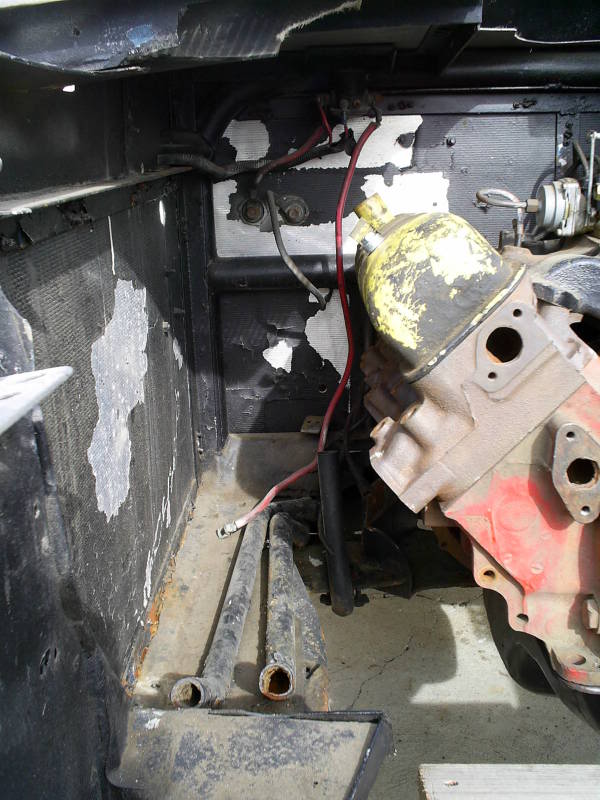 [/img] [/img]
[img]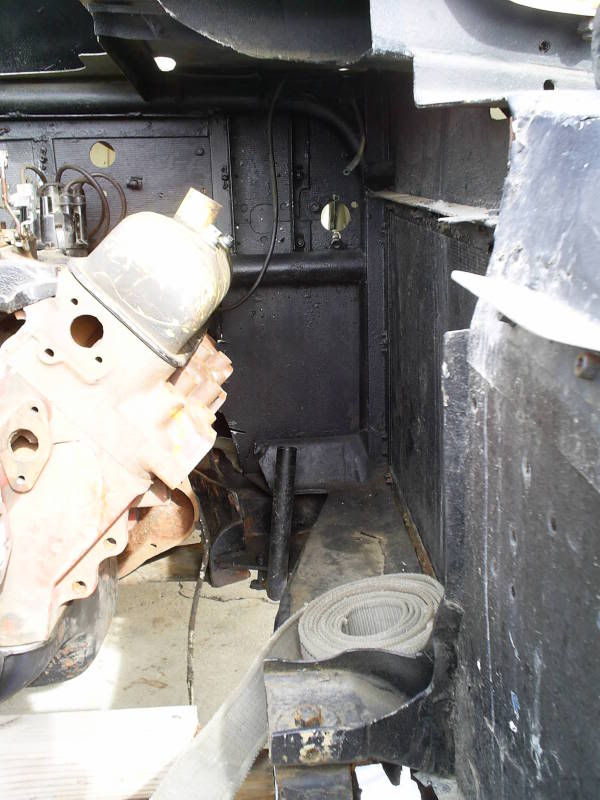 [/img] [/img]
Then I looked at the clearance for the bell housing and
scattershield set up. The rules state that if a scattershield is not
available for the engine make then a shield must be made out of 1/4"
minimum thickness and must cover 360 degrees of containment. So I will
have to add some material to replace the part that has been cut away.
Minor issue but it must be addressed. As a former tech inspector I know
that almost always I could find something that I felt wasn't up to the
rules standards. So I always try and meet every rule and then some in
the hopes I only have to deal with the interpretations of the rules,
not the intent.
[img]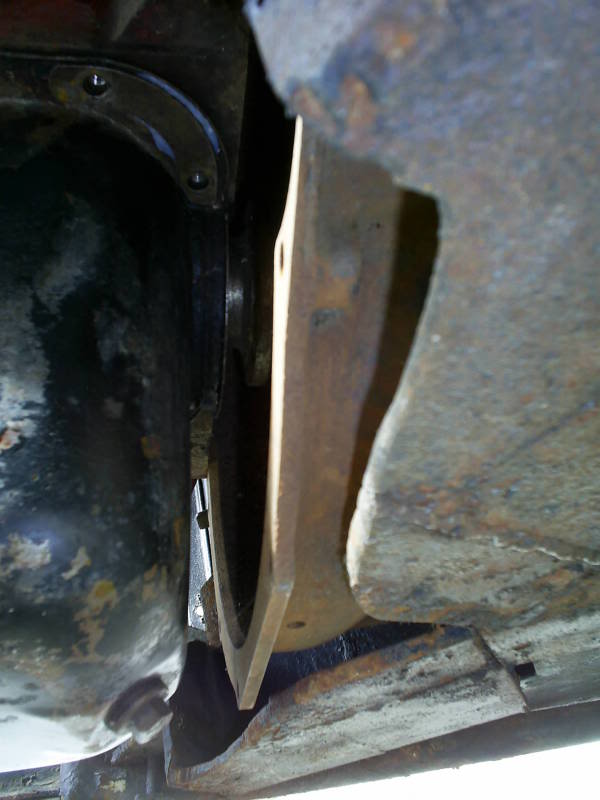 [/img] [/img]
Drivers side view.
[img]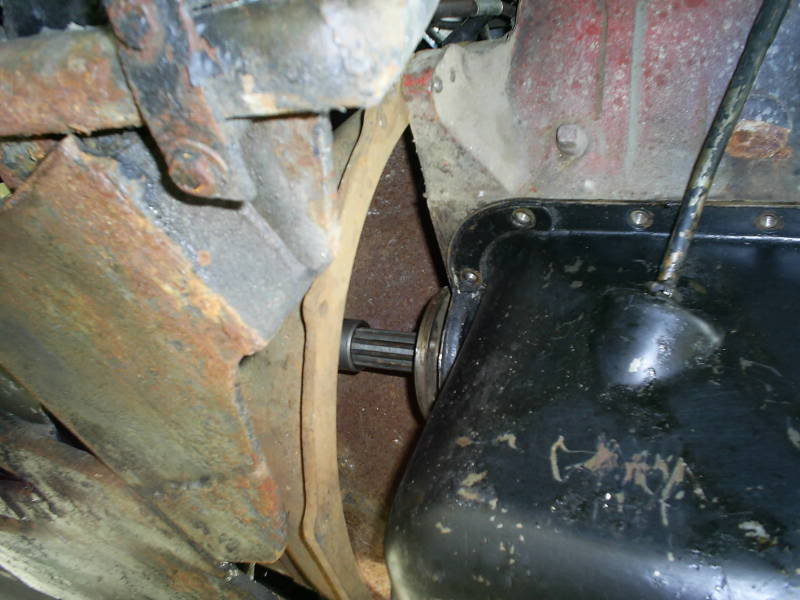 [/img] [/img]
Passenger side view. I also took some shots looking from under the
car up at the engine to see how much clearance there is to run the four
inch and 7/8" tubes from the head to the frame. Looks like there is
plenty of room for headers. I plan to use the rearward mount ears on
the block for the engine to frame plates. So these pictures assured me
that I will have all the clearance I need to make a smooth flowing
exhaust system. I also measured the right and left sides for a Moroso
external oil pump. Lots of room for that too. Here are the photos I
took.
[img] [/img] [/img]
[img]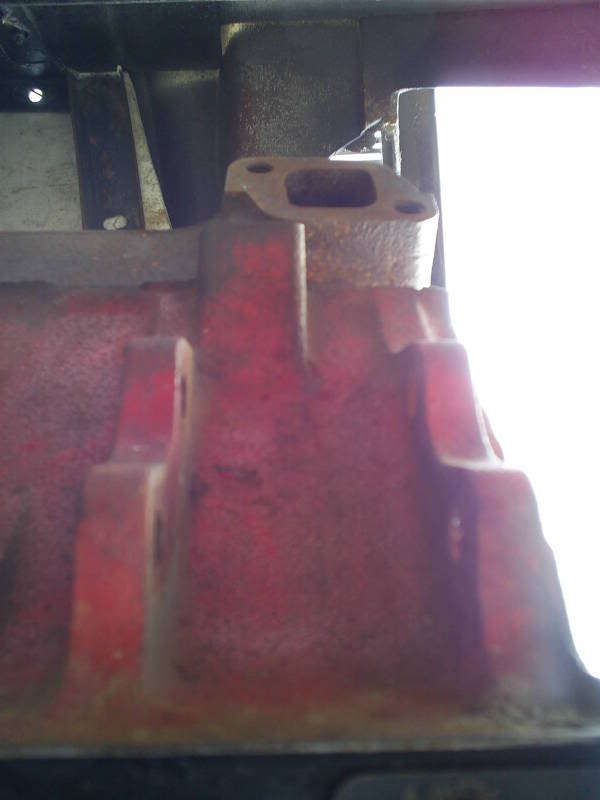 [/img] [/img]
Passenger side photos.
[img]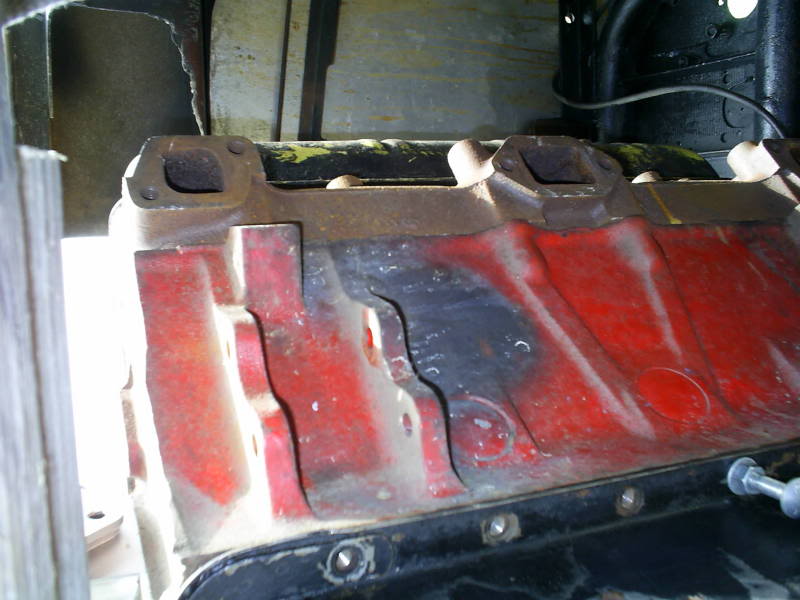 [/img] [/img]
[img]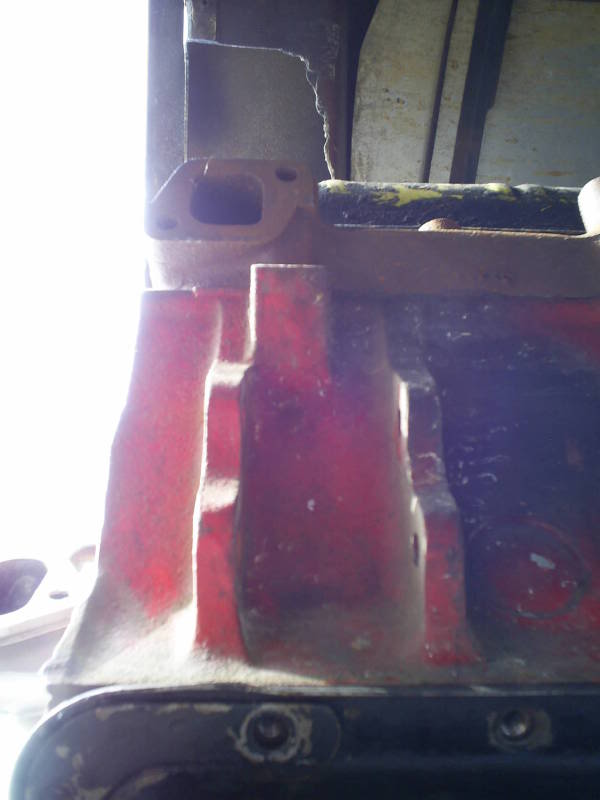 [/img] [/img]
Then I became thankful to the Burke Family for their design of the
engine dog house. The side panels are held in place with Dzus
fasteners. I took the passenger side panel off and WOW what access.
Talk about easy plug changes. The back panel comes off too so you can
access the distributor. So thinking ahead pays off. Try not to feel too
jealous as you look at these photos. All you have to do is cut up your
pristine car and you too can have access.
[img]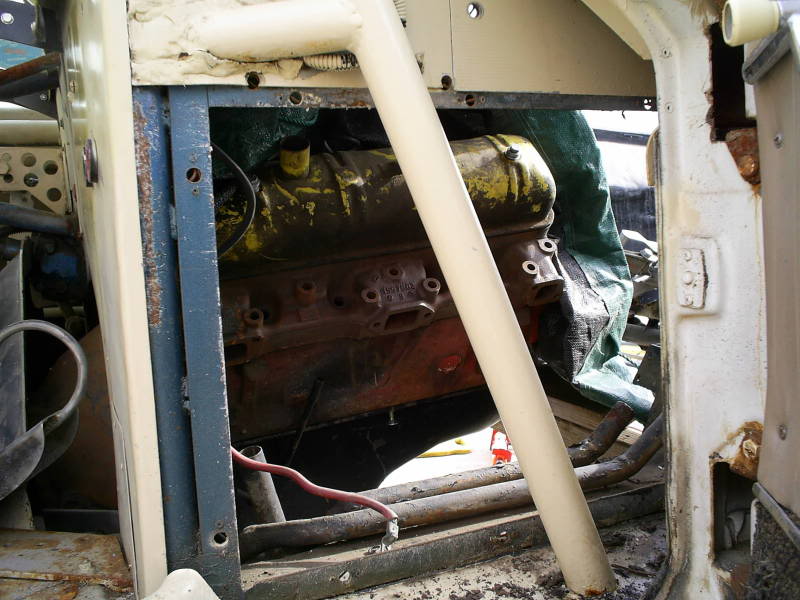 [/img] [/img]
[img]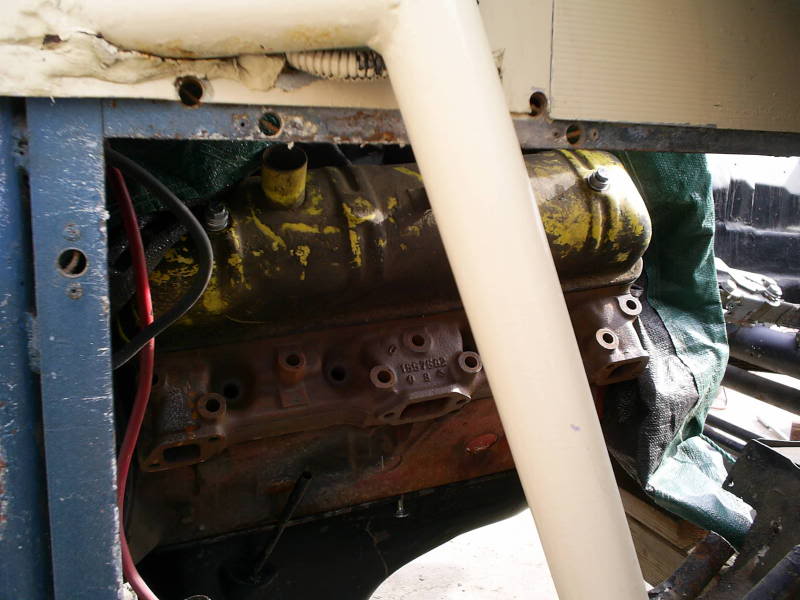 [/img] [/img]
So I need to get the car back on the ground and inside so I can get
things lined out and make the mounts. I don't want to put it on the
ground until the lettering guy does his thing since the car will be
easier to letter up and level. So I wait and do what I can till he is
finished.
Dan
_________________
Grew up Studebaker. Family had a
maximum of fourteen at one time. Drag raced successfully in Southern
California. Wanting to re-live the days. Going to be flying down the
salt in the Burke Avanti in 2010. 200 MHP? maybe. |
|
| Back to top |
|
|
R5 Lark
Studebaker Racing Team Member
Joined: 24 Jan 2006
Posts: 798
|
| Posted: Sun Feb 14, 2010 11:31 pm Post subject: |
|
|
Happy Valentines Day everyone!
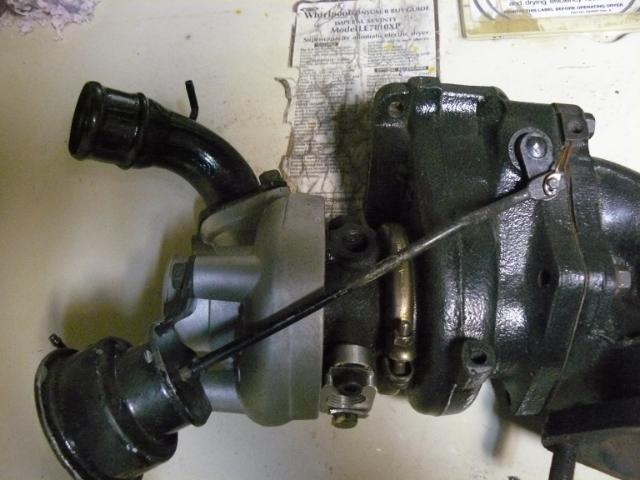
Dan, I went through my stuff here and dug out the turbos from my
Street/Roadster Racing Days. Spent the afternoon cleaning them up. They
are good to go racing.
Found the hangers and cleaned them up for shipment. Both units spin
freely and have no shaft wobble. They are already clocked for each
manifold mounting. You will need AN lines for oil input and drainage to
the oil pan. I think the gating is set around 12 lbs. I will have to
check. Gates are adjustable and boost can be set wherever we need it
for the power and strength of the 259.
I use to low boost them on the street with modest 4-5 lb gating. What
fun days playing with the street cars from stop light to stop light. At
the track I set them 12 lbs plus. They don't spin much at idle but make
sure your helmet and seat belt are on from 2000 up.  Oh, and I will need these back after qualifying. Tom C Oh, and I will need these back after qualifying. Tom C
 |
|
| Back to top |
|
|
SilverHawkDan
R3/R4 Member
Joined: 06 Jan 2007
Posts: 258
|
| Posted: Mon Feb 15, 2010 1:51 am Post subject: Looks Good |
|
|
Tom,
Do you happen to have any pictures of the set up on the car for
reference? It could save a lot of pictures being sent back and forth.
It all looks self explanatory. The only thing you didn't picture was
the air intake into the turbo. Do you have any of the tubing ect? So
let's keep posting and enjoy the ride.
Dan
_________________
Grew up Studebaker. Family had a
maximum of fourteen at one time. Drag raced successfully in Southern
California. Wanting to re-live the days. Going to be flying down the
salt in the Burke Avanti in 2010. 200 MHP? maybe. |
|
| Back to top |
|
|
R5 Lark
Studebaker Racing Team Member
Joined: 24 Jan 2006
Posts: 798
|
| Posted: Mon Feb 15, 2010 4:09 am Post subject: |
|
|
Don't
have many photos from that time period. Was at my elder brother's place
yesterday and ironically he gave me some old photos of cars we both
owned and toyed with as far back as 1960. Here is one of them that got
saved.
This was around 1993-94 because I painted it white in 1995. I think
I still have the down piping. Will look. The filtering is straight
forward on the inlets. I found that the best performance came from
combining both turbo outlets into a nice Y just before the carb. So air
entered the carb in one tube. The carb (AFB) at that time though was
very sensitive to the angle of the bonnet. Will see if I have some
engine photos stuck away somewhere.
In those days I had few dollars for race funding. Yound kids and a big mortgage had to come first.
 |
|
| Back to top |
|
|
SilverHawkDan
R3/R4 Member
Joined: 06 Jan 2007
Posts: 258
|
| Posted: Mon Feb 15, 2010 5:29 am Post subject: Cool car Tom |
|
|
Tom,
That was one cool car. Looks like it had the turbo's on it. Made for a
fun ride I'm sure. So what intake manifold and carb are we using? Also
I am having an ice water aftercooler built for the car and could
incorporate it to this set up. Would that work?
Dan
_________________
Grew up Studebaker. Family had a
maximum of fourteen at one time. Drag raced successfully in Southern
California. Wanting to re-live the days. Going to be flying down the
salt in the Burke Avanti in 2010. 200 MHP? maybe. |
|
| Back to top |
|
|
SilverHawkDan
R3/R4 Member
Joined: 06 Jan 2007
Posts: 258
|
| Posted: Mon Feb 15, 2010 5:57 am Post subject: Confusion |
|
|
Hey Everyone,
I think the last few posts have left some of you quite confused. So to
clear the air, Tom Covington (Yes, that Tom Covington with the White
Super fast Avanti) has agreed to loan me his twin turbo set up from his
past racing days. Studebaker of Lompoc (Tom Mc Caffery) has offered me
two engines for consideration for El Mirage. To refresh your memory the
plan is to take the car to El Mirage on may 14-15 to get the car
certified and to shake it down and help me get used to it. The plan
calls for me getting my 125 and 150 licenses. I also have some other
people in mind for licensing. More on that later. Lompoc Tom has a 224
and a 259 engine. They both have been sitting for years but he did all
the right things when he stored them. Proof of that is the fact that
when he tried to turn them over this weekend they both turned over. So
far so good. Next I will pick them up and do a closer inspection to see
which engine we will use. Tom C. wants to fly out and help with the
tuning and set up for El Mirage. Are the Studebaker guys amazing or
what. So Lompoc Tom if you read this before you get my call tomorrow,
yes Tom and I would like to take both engines.
So barring any major set backs it is looking like we will be ready for
El Mirage with about 300+ HP and plan to have a lot of fun. So keep
checking back as it is going to be fast and furious. Now just in case
you don't think my family is behind this project think again.
Today at lunch my middle daughter (Danielle) gave me a cool
Birthday present. She bought me the motor and trans mounts for the car.
I mean what else do you buy a guy who has everything but needs a
project to keep him off the streets at night? The engine plates are due
back this week and I hope to start the mount fabrication this week and
finish the firberglass repairs. I'd mention the lettering but you are
already familiar with that story.
So I hope that clears up any confusion. If you have a better engine
that you would love to loan to us until June let me know. Always
looking for the best we can get. Keep checking back often.
Dan
_________________
Grew up Studebaker. Family had a
maximum of fourteen at one time. Drag raced successfully in Southern
California. Wanting to re-live the days. Going to be flying down the
salt in the Burke Avanti in 2010. 200 MHP? maybe. |
|
| Back to top |
|
|
R5 Lark
Studebaker Racing Team Member
Joined: 24 Jan 2006
Posts: 798
|
| Posted: Mon Feb 15, 2010 4:07 pm Post subject: |
|
|
Yes,
the ice water intercooler would certainly be a plus in the desert and
drop the boost temperatures. The piping is going to need to marry up
into a single feed to the carb anyway and the ice box junction could
serve that purpose. I'll supply the carbs and intake manifolds. I've
got a R-2 carb and several Holleys already set up for boost. Lots of
fuel jet choices.
I want have the heads ready til March at the earliest. I am waiting
on a cam grinder to give me a regrind quote on a R cam I have.
Starting to get "desert fever" here.  Go ahead an locate a dyno shop that uses a Mustang Model dyno. That
model can simulate air drag resistance correction in the rear wheel
run. tom c
Go ahead an locate a dyno shop that uses a Mustang Model dyno. That
model can simulate air drag resistance correction in the rear wheel
run. tom c |
|
| Back to top |
|
|
Karl
Studebaker Racing Team Member
Joined: 28 Mar 2006
Posts: 662
Location: modesto,ca.
|
| Posted: Mon Feb 15, 2010 7:42 pm Post subject: |
|
|
Hi Dan,
Pictures of spare block i have to offer
Didnt see above post. but its here if you need it.
_________________
|
|
| Back to top |
|
|
SilverHawkDan
R3/R4 Member
Joined: 06 Jan 2007
Posts: 258
|
| Posted: Mon Feb 15, 2010 7:52 pm Post subject: Block |
|
|
Karl,
I know things around here are tending to move rather quickly. So I have
noted the spare block that you have and may need it. Not sure until I
check out the other engines. Good to know I have resouces to draw from.
Thank you for making the offer. It is good to know that people care and
want to be part of this build.
Dan
_________________
Grew up Studebaker. Family had a
maximum of fourteen at one time. Drag raced successfully in Southern
California. Wanting to re-live the days. Going to be flying down the
salt in the Burke Avanti in 2010. 200 MHP? maybe. |
|
| Back to top |
|
|
Karl
Studebaker Racing Team Member
Joined: 28 Mar 2006
Posts: 662
Location: modesto,ca.
|
| Posted: Tue Feb 16, 2010 1:01 am Post subject: |
|
|
Dan.
Question ,How much motor You looking to build. Could maybe save you some time and money.
Karl
_________________
|
|
| Back to top |
|
|
PlainBrownR2
R1 Member
Joined: 01 May 2007
Posts: 86
Location: aurora, illinois
|
| Posted: Tue Feb 16, 2010 1:21 am Post subject: |
|
|
Hey
Tom I saw your turbo pictures there, I can't help but jokingly ask;
Have you been in my parts pile? We both have similar turbos with
similar copper wires on the wastegate to replace the cotter pins.
We seem to share the same love for copper wire being used as cotter pins on the wastegate . |
|
| Back to top |
|
|
|

