6 to
12 to 6Owners of old cars and trucks that came with 6-volt electrical systems know what a drag 6 volts can be! Dim lights, slow cranking, weak spark, replacing generator brushes as a maintenance item, etc .
The cure is obvious... convert to 12 volts! Usually it's pretty easy to convert to 12 volts. Install a nice 12-volt alternator and regulator from the wrecking yard, change the battery, all the light bulbs, the windshield wiper motor, and the ignition coil. The 6v-starter motor usually works real nicely on 12 volts.
The problem is what to do with the stock 6-volt gauges and radio? Often it's desirable to retain these items and drop the 12 volts down to 6 volts to run them. So how are You gonna do that?
One of the common ways to reduce the voltage is by using a resistor. A resistor reduces voltage by an amount proportional to the value of the resistor (in Ohms) times the current flow thru the resistor. The formula (Ohms law) is: V = I x R, where V is the voltage dropped across the resistor, I is the current thru the resistor in amps and R is the value of the resistor in ohms. For example:
You have a 6 volt radio that draws 3 amps. You want run it on 12volts. Your 12 volt system actually is at about 13.8v with the motor running and you want the radio to get about 6.8 volts, which is roughly what the system voltage would be on a running 6 volt system. So... You've got 13.8v, but You want 6.8v on a device that draws 3 amps. 13.8v - 6.8v = 7v, so You need to drop 7 volts across the resistor at 3 amps.. Since V = I x R, it follows that R = V / I, and if we plug our numbers in we get R = 7 / 3 , or R = 2.33 ohms to get 6.8 volts on a radio that draws 3 amps. 2.33 ohms is kind of an odd value, and You will probably have to use 2.5 ohms, which would give 6.3 volts instead. Easy, yes? Ahh, but don't forget the resistor wattage rating!
The power drop across the resistor causes it to heat up, so we need to make sure the resistor can handle the power load without burning out. That's what the wattage rating is all about.. In our example, we dropped 7 volts across the resistor at 3 amps, and since W = V x I, our resistor will convert 21 watts of power into heat. That means our resistor must be rated for an *absolute minimum* of 21 watts. A larger wattage resistor will run cooler, and it's good practice to use a resistor rated for at least 50% higher wattage than You expect to handle. For our radio example, I would use a 2.5-ohm, 40-watt resistor to do the job. 21 watts is quite a bit of heat... think about how much heat a 25-watt light bulb makes! Make sure that You mount voltage dropping resistors where they can't be a fire hazard, or bake any nearby plastic or rubber parts! Be safe, O.K?
One of the problems with using resistors is determining how much current Your equipment draws so You can calculate the correct resistor value. The easiest way is to connect it to a 6-volt battery and connect an ammeter in series to measure the current it uses.
U
nfortunately, often the equipment doesn't draw a constant, steady amount of current. A radio draws more current when the volume is turned way up than it does with the volume down. A gas gauge may draw several times more current when the tank is full then it does when empty. If we go back to our radio example, rather than drawing a fairly constant 3 amps it's much more likely that it will draw a current that varies considerably with radio loudness, and may constantly be varying between 2 and 4 amps. Hmm, if the current varies from 2 to 4 amps that means that with the 2.5 ohm resistor we used in the example, the voltage to the radio actually varies from 3.8 to 8.8 volts! This is not a good thing... What we really need is a resistor that varies it's value constantly and instantly with load changes so as to always keep a constant output voltage...There's quite a few solid-state voltage regulators on the market that can be applied to automotive use. One of the simplest is the 7806, a 6 volt, 1 amp regulator.
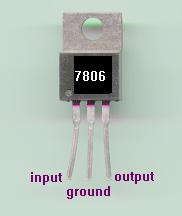
The part looks like this:
And on paper it looks like this: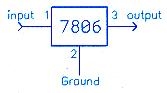
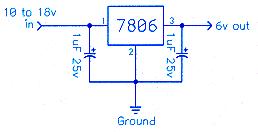
These regulators are rugged, provide over-current shut down, and will give a constant 6 volts output for currents from 0 to 1 amp. They are good for running low current 6-volt things like gauges. If all Your gauges draw a total of over about 0.75amps, it's a good idea to use more than one regulator with one or two gauges connected on each regulator, or use an output transistor to boost current. (Yeah, We'll get to that in a minute) When using the 7806, it's a good idea to connect a small capacitor from the input pin to ground and another from the output pin to ground. The value of the capacitors is fairly non-critical and any value from 0.1uF to 10uF (that's micro-Farads) @ 25volts or more will work just fine. The capacitors help protect the regulator from electrical noise, and to stabilize the output under certain load conditions. My favorite caps for this are 1uF, 35v.
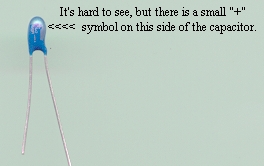
Tantalums that look like:
![]()
So the schematic for the complete regulator circuit looks like:
T
he 7806 will make a little heat, and needs to be mounted on a small heatsink to keep it cool. A little dielectric grease smeared on the back of the regulator will help it conduct it's heat to the heatsink. The heatsink can be a 3" square of aluminum, or a commercially available piece like this one: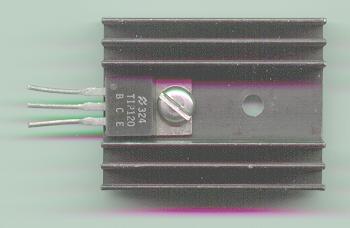 These parts are all readily available and if You have a radio shack nearby You can use these part numbers:
1ea. 7806, (radio shack # RSU 1392008) $1.49ea.
2ea. 1uF 35v tantalum capacitor (272-1434) $0.59ea.
1ea. Heatsink grease (276-1372) $1.99
1ea. Heatsink (176-1368) $1.49
The most obvious flaw with the 7806 regulator is it's rather limited current output. Unless You are only using it to power a couple gauges, 1 amp might not be enough. The cure is to add a transistor to the output of the regulator. This can increase the output current capability to well over 10 amps using the right transistor and a large enough heatsink. There are many high power NPN transistors that will work fine, and I often use a 2N5881 which looks like this:


 Top Bottom Schematic
T
he body of the transistor is the collector connection, so the case is always "hot", directly connected to 12 volts. It is very important to make sure that the transistor body can't contact any grounded chassis parts! In order to insulate the transistor from the heatsink, it's convenient to spend another $1.50 and use an insulating washer and transistor socket like these: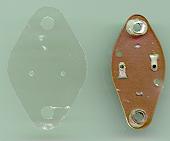

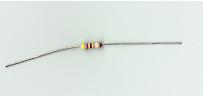 I usually add a resistor from the output to ground to keep the output from floating a little high under no-load conditions. It's not really necessary most of the time, but the part and it's schematic look like this:
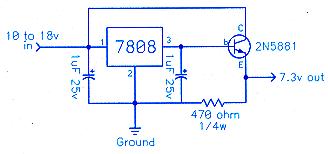 So, here's the full schematic:
Note that this circuit uses a 7808 8volt regulator rather than the 7806 6volt regulator. This is because although the transistor increases the output current of the regulator, it also introduces a 0.7-volt drop caused by the transistors base-emitter junction. This results in the actual output voltage being approximately 5.3 volts, if a 7806 is used. By using the 7808 instead you get a 7.3 volts output. This is at the upper end of what a 6-volt auto electrical system should have when the generator is running, so 7.3 volts is fine. If You would rather have 6.7 volts instead, you can drop the voltage 0.6 volts by adding a 1N4002 diode in series with the input to the base of the transistor. The diode:
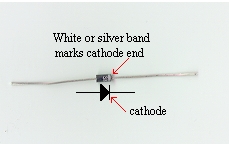
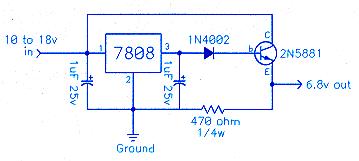 Put it in like this:
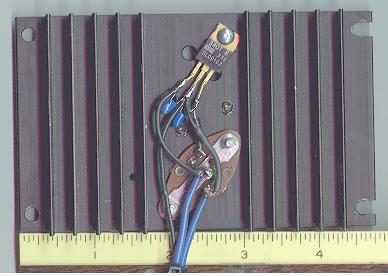
That's the circuit I just built for my girlfriends '51 C-work truck. It puts out 6.8volts with no load and 6.1volts with a full load of 10 amps. The one I built doesn't have a large enough heatsink to run 10 amps continuously, but can deliver over 6 amps continuous with short bursts of well over 10 amps. I figure that's plenty of juice to run all her 6volt
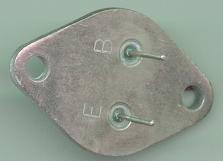
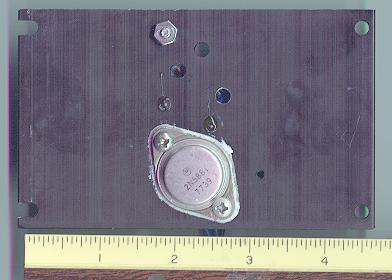 accessories... Here's what hers looks like from the back :
 And the front:
So, that's about all there is to the regulators. The key to making the regulators work is keeping them cool, so be sure to use a good heatsink and put a thin coat of silicone grease on the regulator and transistor and any insulating hardware. Mount the heatsink where it can get some air circulation, don't put it in an airtight box. Don't mount it where the heat it generates can cause trouble for any plastic or rubber parts nearby. Remember that the body of the transistor and all the other parts are electrically "hot" when the regulator is powered up, so make sure nothing can come in contact with it and short anything out. It's a very good idea to put an inline fuse on the input side of the regulator in case "something bad" happens.
Happy motoring!