| Author |
 Topic Topic  |
|
|
Lark Parker
Cruiser Member

USA
235 Posts |
 Posted - 12/23/2007 : 7:46:03 PM Posted - 12/23/2007 : 7:46:03 PM


|
My original plan was to cover straightening "tricks" or practices first, then discuss polishing, and then the buffing. That way some people could benefit a little from the straightening process even if they never get around to polishing and buffing.
Here, I'm going to jump to polishing and buffing for just a little info to keep those people (who evidently want to eat dessert first) happy.
Trim restorers refer to the sanding steps as "polishing"; I guess that sounds more exotic.
Buffing is what you think it is: Uses a cloth wheel that goes round and round and makes it hard to hear the radio.
Before I forget: If you have a heart pacemaker you may want to check with your quack before you do any buffing. The buffing process can generate a heavy dose of static electricity and I DON'T KNOW what that might do to a pacemaker. If anyone knows for sure, please comment.
For show quality results, it is rare to straighten a piece to a satisfactory appearance without doing some polishing, and then repeating the straightening again. I use polishing and some cursory buffing like a body shop uses a "guide coat" for near finished body work. I double back to "the hammering part" to do the final straightening and fine hand sanding, then buff again.
The polishing part is 95% of buffed trim's shiny appearance. Note that polishing is just as important to the "shiny" result as it is to the straightening part. Before learning that, I was unhappy with my results and had bought just about every snake oil available from the buffing supply vendors as I tried to do better. That idea that polishing is much more important than realized -- is the most helpful thing I learned from the body shop coach.
I DON'T USE any color buffing compound other than white. I don't use a wheel rake. I don't use any polishing compounds. I don't use any buffing wheel but the spiral sewn cotton type. I don't use any special creme to remove burn discoloration. In short, you don't need to buy any of that stuff no matter their glowing description and promise of a lustrous finish appearance. There is no reason for others to have to spend money and learn as slowly as I did. All those products slowed the learning process for me until I objectively determined their value to the process. Useless.
I don't use files or sandpaper coarser than 320 grit. ( Even 320 grit is seldom used and is only for a rescue attempt on a badly damaged SPOT). While we are on this point. Don't sand the whole piece when just one spot needs it. Obviously, DUH, if you do that you are damaging the piece and creating more work to take out the coarse sanding scratches. Sanding is mostly started with a grit no coarser than 800 or 600 grit. I don't use sandpaper finer than 1200 grit. I only hand sand on the final, repeat polishing step. All other is done by power sanding.
DON'T USE A RANDOM ORBITAL SANDER. DON'T USE A RANDOM ORBITAL SANDER.
In case that is misinterpreted let me put it this way: DON'T USE A RANDOM ORBITAL SANDER.
You can use your random orbital sander if it also has a CIRCULAR mode, and you use it in the CIRCULAR mode.
Air powered sanders are OK for doing stainless work and I have seen satisfactory results by others using them. Those usually have selectable both circular and random orbital modes.
I prefer light weight electric sanders: single, or two speed. That way I'm not fighting with an air hose and running a high horsepower air compressor motor. Sander speed isn't very important.
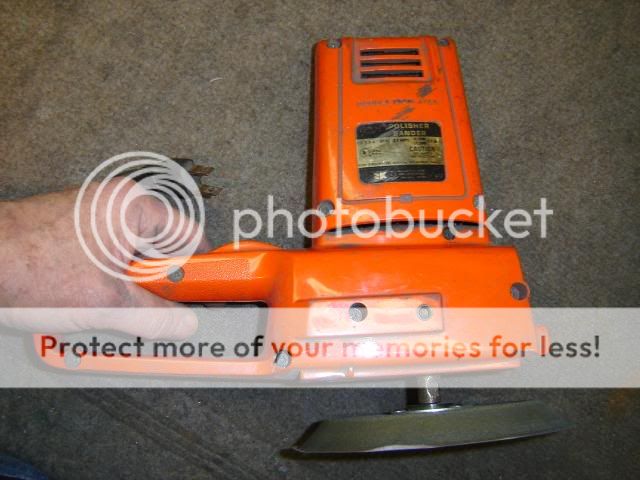
This is the sander that I first started with. It's a 1950's-60's circular sander from Kresge's / K-Mart. It still works and I keep it for backup. It weighs almost 3 lbs. I show it so that people will know that a lot of money for equipment isn't necessary
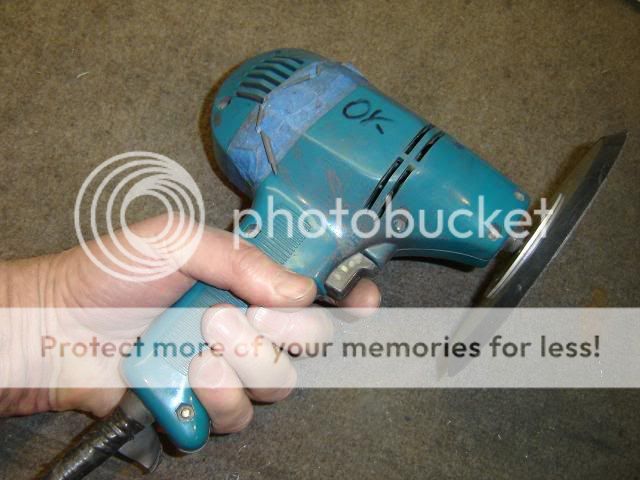
Now I use circular electric sanders such as these. They are usually 5"size, so I tap a new threads in the shaft to accept a 6" pad. This size opens up a spectrum of readily available fine grit paper. Sticky back paper goes up through 1200 grit.( When I tried 1500 grit there was no seeable improvement in the result so that grit was dropped.) The original metric threaded hole can just be rethreaded to standard without redrilling. The 6" pad makes the body shop fine grit available to be used. I use the sticky back pad and 3M sandpaper discs (NOT HOOKIT).
Most of these sanders are cheap Chinese and some don't last as long as they should. Their trigger switches are a common failure. But better quality sanders similar to these usually weigh more. The Chinese cheap sanders are light and I'm willing to put up with a higher failure rate for the 2.5 lb weight. The one above has a 6" pad from NAPA. All brands of pads are kind of poor as far as running true but they can be tweaked in so that the paper wears more evenly. Use bending or sticky paper shims between the metal hub and the pad.

Here's one fitted with a 3" pad so that the 6" sandpaper discs, when they get worn away on the outside edge, can be trimmed and used some more as a 3". The 3M sandpaper was over $.80/sheet on my last buy so trimming does pay if you have two sanders/pads.
If you are doing all your sanding by hand, I have no suggestions for success other than you should drink Gatorade to avoid cramps.

Stone guard. It is shown for those that need convincing that 1200 grit can give an acceptable result.
Stone guards are often pitted so badly that severe sanding is necessary for the pit removal. Pitting damage is usually so plentiful that pit removal by a punch is out of the question. Fortunately, stone guards and rocker strips are heavier gage metal than most pieces and sanding pits out is therefore possible. Pitted windshield pieces would be tinfoil with that same sanding treatment.
The very bottom of stone guards and the lowest back end of the wheel well trim pieces take the most punishment on the road. Since they are curved under (out of sight) the owner can decide how thin he wants the metal to be in that area that gets the most road abuse. If the car will never see a gravel road again-- you can go for out of sight perfection. For "drivers" I would leave them a bit thicker there (leave a few pits) than for a concours competitor.
 Lark Parker Lark Parker
If at first you don't succeed -- you will get a lot of advice.
|
|
|
mbstude
Commander Member

USA
3237 Posts |
Posted - 12/23/2007 : 8:57:32 PM


|
Thanks Mr. P, keep it coming. 
Each installment just amazes me more! 
Matthew Burnette
'59 Scotsman
'63 Daytona
Hazlehurst, GA
 |
 |
|
|
Kdancy
Golden Hawk Member

533 Posts |
Posted - 12/24/2007 : 07:18:20 AM
|
| Excellent series. Should be a "sticky" for stainless trim work. |
|
|
|
Andy R.
Champion Member
USA
24 Posts |
Posted - 12/24/2007 : 10:36:13 AM
|
Thank you so much for this series. I agree it warrants a sticky.
Those of us who don't need to use it eventually will. |
|
|
|
JDP
Commander Member
USA
5496 Posts |
Posted - 12/24/2007 : 11:22:56 AM
|
Glad to read that I'd sorta done in right on Sid, but with modifications. Sid's stainless had been restored but had minor scratches from storage, mounting and maybe the car cover. Since it was still pretty nice, and already on the car, I started with 1000 grit, 600 just where needed, then finished with 2000 grit and a hand polish with white stainless/chrome polish.
JDP/Maryland
63 R2 SuperHawk (Caesar)
spent to date $54664,75
64 R2 GT (Sid)
spent to date $62,439.30
63 Lark 2 door
51 Commander
39 Coupe express
39 Coupe express (rod)
|
|
|
|
Lark Parker
Cruiser Member
USA
235 Posts |
Posted - 12/24/2007 : 12:08:33 PM
|
My way is just my way and not much more. I deliberately present things in a manner sometimes to keep from getting into "distracting discussions".
But, I think people should discuss hand methods. The way I do stainless may require more equipment than the average guy would want to lay out for just one car. (Even though nobody has just one Studebaker. ) )
I believe that a lot of people would be interested in what can be done to the trim without removing it from the car. I have been no help to them. My guess is that grits higher than 1200 would be helpful in thaat case.
I will stay out of those discussions as I am ignorant of what is needed. I was apalled at first that someone would take 40 hours to do a car --- until I started thinking about it. That amount of time was probably needed considering the method. I applaud anyone that will put that effort into making his car the way he wants it.
When I was vending the stainless resto service, I was often asked advice. But, I was/am almost helpless to advise a guy who is doing a car by hand on how to do it better. I started using power from the beginning because of the influence of my brother who had access to some big buffers.
------------------------------------------------------------
I am not sure what being made into a sticky means but it sounds uncomfortable.
While I am sharing info here, I would like to retain the ability/ownership to reprint it for those people without computers.
(One never knows what lurks in the fine print.)
If we do enough of these little sampler info bits, They might get sequentually reorganized into something useful.
-------------------------------------------------------------
The Hawkeye Chapter has shown some interest in having a stainless seminar in the 2009 so we will see if that is feasible.
There is still the problem of just how many people would be interested, what can be done in a short time, and the mechanics of how to present close up work.
--------------------------------------------------------------
Thank you and have a Merry Christmas.
Lark Parker
If at first you don't succeed -- you will get a lot of advice.
|
Edited by - Lark Parker on 12/24/2007 12:53:56 PM |
|
|
|
JDP
Commander Member
USA
5496 Posts |
Posted - 12/24/2007 : 4:07:13 PM
|
I was surprised to find that after a pass with wet sanding using 2000 grit the trim looked almost done, with just the tiniest scratches that came out with the metal polish. It really makes the stainless look good, even the window trim.
JDP/Maryland
63 R2 SuperHawk (Caesar)
spent to date $54664,75
64 R2 GT (Sid)
spent to date $62,439.30
63 Lark 2 door
51 Commander
39 Coupe express
39 Coupe express (rod)
|
|
|
|
jjones
Cruiser Member
USA
150 Posts |
Posted - 12/24/2007 : 6:44:59 PM
|
I have been using your methods on the hood trim on my M, and await each installment with bated breath. My trim is coming out beautifully. My goal is to have it look as nice at the grill piece I bought from Fred Cook, that I believe you restored. I think, with your help, it will get there. Thank you so much. Now, if one of you hammer and dolly body men would do a similar piece on how to do Studebaker body work the old fasioned way, I would be in heaven.
Well, time to face the extremely active and excited 2-year-old grand son, wish me luck. Merry Christmas to all.
Jeff |
|
|
|
bondobilly
Golden Hawk Member
USA
655 Posts |
Posted - 12/26/2007 : 8:35:23 PM
|
I have a question. The big stainless bands over the rear windows on Hawks, were they ever bright shinny, see forever into them, or were they a tad dull?
Thanks |
|
|
|
JDP
Commander Member
USA
5496 Posts |
Posted - 12/26/2007 : 9:37:49 PM
|
My wide windshield molding were a bit dull too, but make a decent mirror now. Wet sand that band with 1000, then 2000 and polish and you'll be shocked.
JDP/Maryland
63 R2 SuperHawk (Caesar)
spent to date $54664,75
64 R2 GT (Sid)
spent to date $62,439.30
63 Lark 2 door
51 Commander
39 Coupe express
39 Coupe express (rod)
|
|
|
|
Lark Parker
Cruiser Member
USA
235 Posts |
Posted - 12/27/2007 : 5:16:25 PM
|
quote:
Originally posted by bondobilly
I have a question. The big stainless bands over the rear windows on Hawks, were they ever bright shinny, see forever into them, or were they a tad dull?
Thanks
I assume that you are referring to the roof bands that are found on Speedsters and mid-50's Hawks. (Actually there is a little difference between the Speedster band and the Hawk bands.)
All stainless oxidizes over 50 years or so and would benefit from some TLC. NOS pieces have oxidized right along with those pieces on the cars. The roof bands usually have some rows of stretch marks caused by the stamping dies and are located at the sharpest curve points. Leaving the stretch marks in should not detract from the points if the judging is correct. I usually take them out for a better appearance but that might be tough to do without power sanding. Those pieces finish nice because there is a slight rounding in the front to back "flat" surface.
If you decide to remove that band for work, take the screws off the back of the solid metal strap type clips from inside after you have taken the back of the headliner down.
Lark Parker
If at first you don't succeed -- you will get a lot of advice.
|
Edited by - Lark Parker on 12/27/2007 5:17:31 PM |
|
|
|
bondobilly
Golden Hawk Member
USA
655 Posts |
Posted - 12/27/2007 : 7:06:17 PM
|
[quote The roof bands usually have some rows of stretch marks caused by the stamping dies and are located at the sharpest curve points. [/quote]
Now us guys can proudly state. "wanna see my stretch marks".
Yes, I noticed them One thing I won't do is pull the band off. Best way ever to screw up a new paint job, when you put it back on. I have a nice shine on mine, but not mirror like, and I am sure if I start futzing with it I will create more damage.
I did soend about two hours today using your method for polishing up some trim that had dings. It worked, not that I did not trust you, I did not trust me.
BG |
|
|
|
Karl
Regal Member

USA
339 Posts |
Posted - 12/30/2007 : 7:47:20 PM
|
L P , this is good stuff.
Bob S., a sticky for stainless would make it easier for others to use this info. :D]Thank you :D]Thank you
 |
Edited by - Karl on 12/30/2007 8:04:39 PM |
|
|
| |
Topic |
|