| Author |
 Topic Topic  |
|
|
Lark Parker
Cruiser Member

USA
235 Posts |
 Posted - 12/17/2007 : 1:35:21 PM Posted - 12/17/2007 : 1:35:21 PM


|
Stainless restoration #4, Outside Windshield Trim
I made up my own terms for some of the stainless pieces that are commonly found on Studebakers. Since I am lazy this was easier than looking up the correct terminology. Feel free to comment and supply the right term whenever you just can't live with mine. I really don't care. Honest. You'd be doing a service.
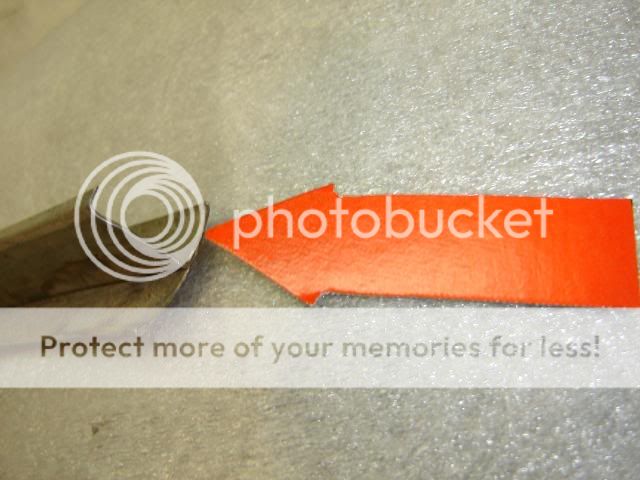
This picture shows the end of a stainless trim piece that I call a T shape. For the newbys this part is frequently found imbedded in the age hardened rubber moldings around the windshield and rear window of postwar Studebakers.

The T shape was designed to embarass the novice who tries to remove the piece without removing the rubber molding from the windshield opening at the same time. Notice the little L shape at the T stem's end. The T stem sits down in a deep groove in the rubber molding and the little hook on the end keeps it there. The hook securely holds the stainless in as long as there is car around that big rectangular hole the window sets in. Once the glass, rubber molding, and stainless are removed as an assembly, there will be enough room to work the stainless out of the rubber without damaging it.
The piece was designed by an engineer using an Etch A Sketch. Starting at the lower left hand corner of the piece the metal goes all the way across, folds over, comes half way back and then makes a right turn and goes up to end up at that little securing lip.
Pretty boring, really. --- Until you notice the side the arrow points to is twice as thick as the other side. As a Studebaker trim straightening professional you need to look at the piece carefully first because if you are taking a dent out of this piece, you need to whang that double layer side twice as hard as the other side. If you are pushing a dent out from the back of the piece, a smaller ended tools (a punch) can be used on the double layer side as the tool tip force will be distributed by the second (back) layer. The other single layer side will practically move when you breath on it.
Mild edge variations on the single layer side can often be removed by thumb pressure. Conversely, the body man will put the variations back in with thumb pressure during reinstallation. That's job security for both of us.
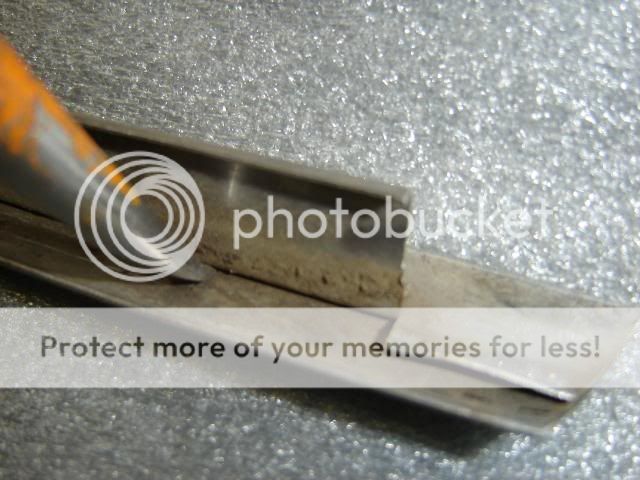
The back of a dent that is in the exact middle is hard to reach because of the vertical piece of mounting metal. I often use a bent, punch made into a blunted chisel shape for those spots. It will have to be forced a little to reach in between the metal layers. Take it easy. Hand pressure may be enough to remove the "dent".

In reality this tool used to be a cheap Chinese made punch that I have abused to that shape. Tools from China are soft enough that they can be reworked. The stainless work is so lightweight that soft tools hold up OK.

The damage to the piece on the left was probably made by someone prying the piece up without removing the rubber molding from the car. The separation of the layers is typical damage and that has about ruined the piece for repair. Getting it to lay down on the rubber molding like it did when new is not likely to happen.
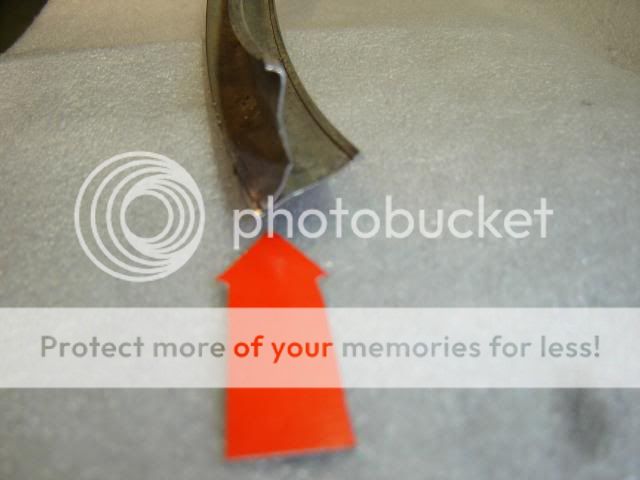
Also, since the piece is torn at the fold it is not reasonable to fix that. An edge weld on such thin stainless is not a happy sight. That tear does not show well in the picture but take my word for it -- it is torn there.
If that is the only such trim piece left on earth, your easiest option may be to shorten the piece and then narrow the car to fit. We had to rebuild Joe Bacon's car to 15/16 scale to get all the stainless to fit. It did turn out well.
When one does successfully, and incorrectly, get the END of piece out of mounted rubber, further prying and or pulling up may result in vertical kinking type damage in the middle of the piece if the vertical section gets stretched. ( That little hook is a very effective retainer.) I did fix one such damaged on an Avanti lower windshield piece. The owner couldn't find a replacement piece. I had to think about how to do that repair a while and I will take the secret method to my grave. Unless someone with two dollars needs to know .

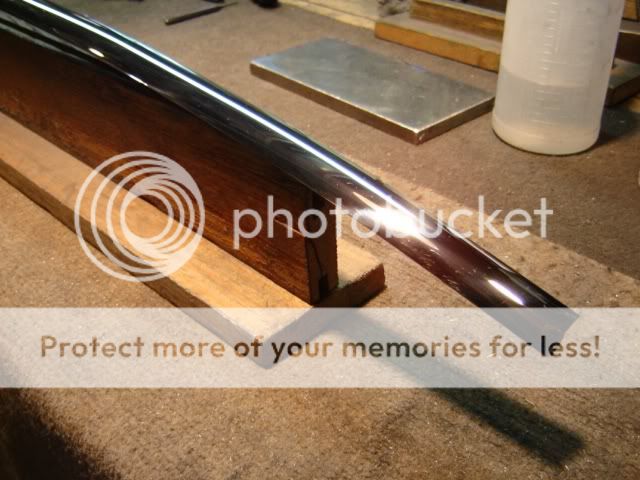
A piece of grooved wood is very helpful to hold T pieces while you polish (sand) after straightening. This was made from old scrap tongue and groove and then improved upon by deepening the groove at the end corners. If you have very many to do, it does away with chasing a twisting turning curved T trim piece across the workbench. Also, using a vice for a holder has drawbacks.

I have a couple of these of different lengths. The longer ones will not accept a trim piece that has a lot of side curve. The short ones work better there. Make them tall enough to get piece clearance to the workbench top. On some, it is still necessary to let it hang over the end of the bench.
Last time, in number #3, I said we would cover a common child's toy used for stainless restoration. I lied. We will cover that next time.
 Lark Parker Lark Parker
If at first you don't succeed -- you will get a lot of advice.
|
Edited by - Lark Parker on 12/17/2007 4:53:42 PM |
|
|
52hawk
Commander Member

USA
1062 Posts |
Posted - 12/17/2007 : 4:44:14 PM
|
This gets better with each installment!! Thank You for the great work so far! I need to fix some small,but sharp 'outies' on one of my quarter panel strips.I'll wait to see if you cover those..
LaSalle,Il
61Hawk
|
 |
|
|
Jerry Forrester
Cruiser Member
USA
235 Posts |
Posted - 12/17/2007 : 5:33:16 PM
|
Dale, if you keep at it, one of these days you'll be confident enough in your abilities to start doing '55 butter knife trims. 
Jerry Forrester
Douglasville, Georgia
Be sure to check out my eBay store
https://stores.ebay.com/CHROME-CHROME-CHROME_
for your shiny Stude stuff

More pix of Leo the '55 Pres HT here...https://tinyurl.com/2gj6cu
|
|
|
|
Lark Parker
Cruiser Member
USA
235 Posts |
Posted - 12/17/2007 : 6:09:20 PM
|
quote:
Originally posted by 52hawk
This gets better with each installment!! Thank You for the great work so far! I need to fix some small,but sharp 'outies' on one of my quarter panel strips.I'll wait to see if you cover those..
LaSalle,Il
61Hawk
If you are referring to a 53-55 C/K or a 62-64GT --- see the notched blocks in resto post #2.
If it damage from the clips not being correctly lined up on one of those cars, the damage will reoccur when you put it back on. Pay attention that you eliminate the source of damage or your straightening and polishing work will be wasted. The overlapping fender edge is not a reliable "straightness gage" unless it was installed straight by the restorer/factory.
Other model cars require other model answers. I've never done any 52hawk pieces.
Lark Parker
If at first you don't succeed -- you will get a lot of advice.
|
|
|
|
Lark Parker
Cruiser Member
USA
235 Posts |
Posted - 12/17/2007 : 6:14:24 PM
|
quote:
Originally posted by Jerry Forrester
Dale, if you keep at it, one of these days you'll be confident enough in your abilities to start doing '55 butter knife trims.
Jerry Forrester
Douglasville, Georgia
Be sure to check out my eBay store
https://stores.ebay.com/CHROME-CHROME-CHROME_
for your shiny Stude stuff
More pix of Leo the '55 Pres HT here...https://tinyurl.com/2gj6cu
Jerry, I have found a labor saving way to do those 55 butterknife pieces. I tell them they would look much better chromed and the chromer will straighten them.
My remaining lifespan is not sufficient and most customers don't want to get a second mortgage anyway.
Lark Parker
If at first you don't succeed -- you will get a lot of advice.
|
|
|
|
Jerry Forrester
Cruiser Member
USA
235 Posts |
Posted - 12/17/2007 : 8:10:14 PM
|
quote:
I tell them they would look much better chromed and the chromer will straighten them.
Lark Parker
Pullleze don't do dat. We have enough people wanting us to make silk purses out of sow's ears.
Did you see what I did to Leo, the '55 Pres HT? He's in my signature line.
Jerry Forrester
Douglasville, Georgia
Be sure to check out my eBay store
https://stores.ebay.com/CHROME-CHROME-CHROME_
for your shiny Stude stuff
More pix of Leo the '55 Pres HT here...https://tinyurl.com/2gj6cu
|
|
|
|
KGlowacky
Regal Member

USA
447 Posts |
Posted - 12/17/2007 : 9:41:31 PM
|
| I hope someone does a forum on ss polishing. I have done my own in the past but it never looks as good as when I pay big money to have it done. |
|
|
|
Son O Lark
Champion Member
29 Posts |
Posted - 12/19/2007 : 12:02:29 PM
|
Is the kid's toy "Barrel of Monkeys"? How about "Sea Monkeys"?Third chance answer: Is it Playskool Toy hammer and screwdriver? I know the real answer but Mom won't let me tell. I know the real answer but Mom won't let me tell. |
Edited by - Son O Lark on 12/20/2007 10:17:29 AM |
|
|
| |
Topic |
|